(!)Since support from Microsoft will end on January 14th, 2020, Windows 7 will be excluded from the recommended environment from December 15th, 2019 on this site.Vì lý do Microsoft kết thúc hỗ trợ cho Windows 7 vào ngày 14/01/2020, Windows 7 sẽ là hệ điều hành không được khuyến khích sử dụng với trang web này từ ngày 15/12/2019.
Helpful application examples for mechanical engineers.
The Concept of inCAD Library
Online application library with a range of ideas for all manufacturing industries.
Save design time and learn new design applications when you are concepting new machines.
Disclaimer
MISUMI may not offer all parts in each application design. Available parts can only be purchased separately not as a unit shown in each application design.
MISUMI does not guarantee quality, accuracy, functionality, safety or reliability for the combination of the parts in each application example. Accept these points prior to use.
2014 Copyright MISUMI
The data cannot be used for any purposes (including sales promotion) except for designing your machine.
All associated CAD is free. Misumi reserves the right at its sole discretion to cancel, terminate or modify this offer.
MISUMI may change, add or delete application examples posted without prior notice.
MISUMI assumes no responsibilities for any damage incurred resulting from your use of the Service or any change, addition or deletion by MISUMI of the application examples for any reason whatsoever.
inCAD Library Features
Get great new design ideas for these application examples.
Over 300 design application ideas
collected from dozens of industries!
Find application examples quickly! Search by function, workpiece shape, etc.
Download the CAD models for each application example.
Log in to download free CAD models.
Download CAD for the entire application example!
Good IDEA! button
Click the Good IDEA! Button when you like an application example!
*Can only be clicked once per application example.
Upper right corner on the page of application example details
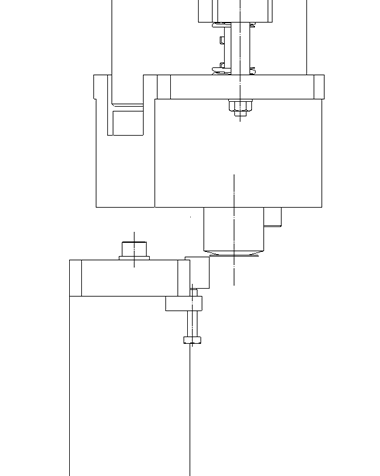
To prevent thin workpieces from overlapping, a separation plate is installed in the middle of the transfer path to the press-fitting part.
TERMS AND CONDITIONS FOR USE OF CAD DATA
Your access to the CAD data that MISUMI Corporation (hereinafter referred to as the Company) posts on this site (including 3D CAD data, intermediate 3D CAD data and 2D CAD data; hereinafter referred to as the Data) are of products manufactured and/or sold by the Company (hereinafter referred to as the Products) assumes that you have read and accepted these terms and conditions which govern your use of the Data. If you do not agree to these terms and conditions, you must stop using this website and the Data. You must not use the Data for any unlawful purpose or in any manner inconsistent with these terms and conditions.
1. CAD Data
The Data is prepared for assisting the Company's users in the CAD design process by providing dimensions and other Product information. In order to provide the best speed and stability working within this site, the Product drawings were simplified to reduce the size of the Data. For instance, some of the Products are shown without the oil groove shape, screws or spring shape. Also, please be aware that the tolerance, surface roughness and/or chamfer of the Data may vary from the actual Products.
2. Disclaimer on Data
While the Company has carefully prepared the Data, accuracy of the Data is not guaranteed and is subject to the variances as described above. The Company may also modify, add or delete the Data at any time without prior notice. The Company assumes no liability for any direct, indirect, consequential or special damages that you may claim resulted from your use of the Data or any changes to or deletions of the Data regardless of the reason. The Company provides no warranty as to the quality, accuracy, functionality, safety or reliability of the combination of Products and parts. Example applications and combinations of the Products are provided for illustrative purposes only.
3. Copyright
Copyrights to the content and the Data belong to the Company or the manufacturers of the Products. The said copyright is protected by the Copyright Act and international treaties. The use (including duplication, modification, uploading, posting, transmission, distribution, licensing, sales and publishing) of the Data except for the purpose to use the Data described above without prior approval of the Company is not allowed. The Data cannot be used for any purposes (including sales promotion) except for designing your machine. If you violate this provision or the laws or regulations, the Company may prohibit you from the use of the Data, the Company’s site and/or take legal action. So long as you comply with these terms and conditions, the Company grants to you a non-exclusive, non-transferable, revocable license to access and use the Data for the sole purpose of assisting you in designing machines that incorporate products.
In case that the CAD data is found to
have been to be used for any purpose other than mentioned above or
against the related laws, MISUMI may take legal actions, including
the one for blocking the involved user from using CAD data and from
accessing to the MISUMI site.
4. Disclaimer of Warranty
ANY AND ALL CONTENT APPEARING ON THIS WEB SITE IS PROVIDED FOR INFORMATIONAL PURPOSES ONLY. THIS WEB SITE, ITS CONTENT AND ITS LINKS ARE PROVIDED ON AN "AS IS" AND "AS AVAILABLE" BASIS AND ARE USED ONLY AT YOUR SOLE RISK, TO THE FULLEST EXTENT PERMISSIBLE BY LAW. THE COMPANY DISCLAIMS ALL WARRANTIES, EXPRESS OR IMPLIED, OF ANY KIND, REGARDING THIS WEB SITE (INCLUDING ITS CONTENT, HARDWARE, SOFTWARE AND LINKS), INCLUDING AS TO FITNESS FOR A PARTICULAR PURPOSE, MERCHANTABILITY, TITLE, NON INFRINGEMENT, RESULTS, ACCURACY, COMPLETENESS, ACCESSIBILITY, COMPATIBILITY, SECURITY AND FREEDOM FROM COMPUTER VIRUS. THE COMPANY WILL NOT BE LIABLE FOR ANY DAMAGES OR LOSSES, INCLUDING DIRECT, INDIRECT, CONSEQUENTIAL, SPECIAL, INCIDENTAL OR PUNITIVE DAMAGES AND/OR LOST PROFITS, IN CONNECTION WITH USE OF THE INTERNET, THIS WEB SITE, ITS CONTENT OR ITS LINKS Further, the Company will not be liable to you for any failure or delay by the Company to provide access to the Data or any of its obligations under these terms and conditions where such failure or delay is the direct or indirect result of any circumstances beyond the Company's reasonable control (and the Company's obligations will be suspended for the duration of such circumstances).
Assembly data shows the assembly drawings in the concept design phase. The sole purpose of the data is to explain the structure and functionality of the assembly and is not considered nor to be used as a final design.
You will need to edit the Data so that it meets your specific design conditions.
Unit assembly Data consists of some sub-assemblies.
It is configured so that each sub-assembly unit can be used as it is or edited.
* The part in the frame is a sub-assembly unit.
The Data for fabricated parts is based on easy-to-edit dimensions and shapes in sketches and histories.
The Data including the third-part components are made by the Company.
* Unit assembly Data consists of some sub-assemblies.
It is configured so that each sub-assembly unit can be used as it is or edited.
Application Overview
Purpose
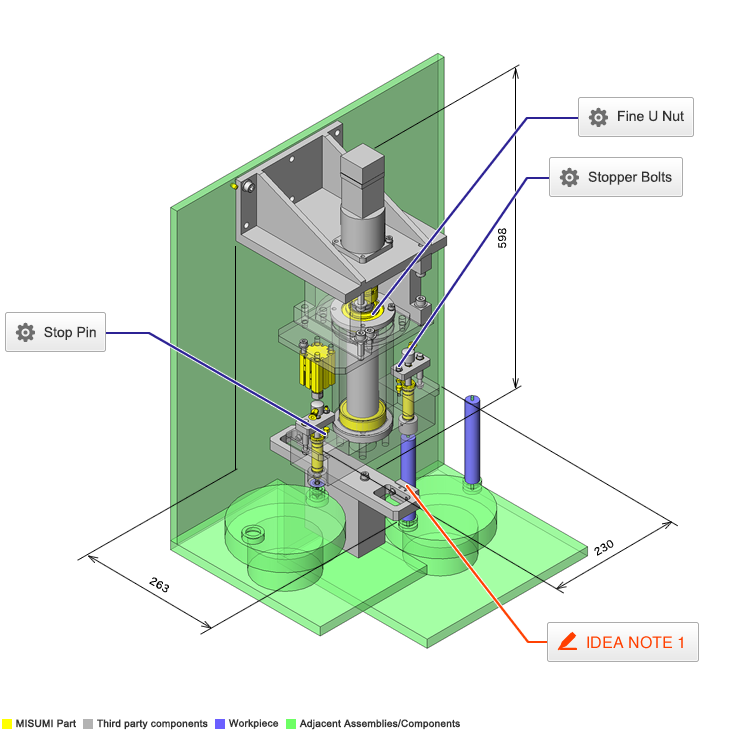
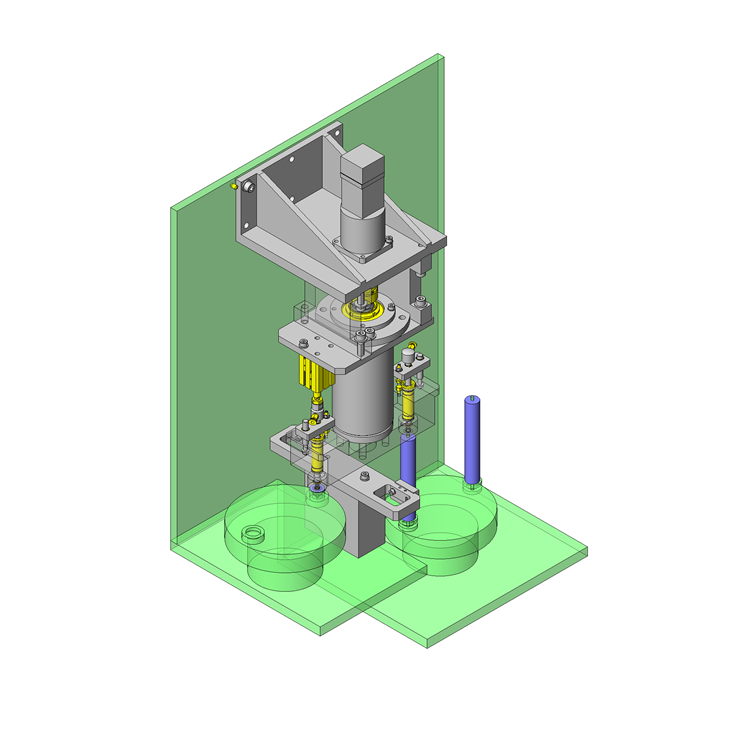
Purpose: To transfer and press-fit washers. Operation: A washer is suctioned by vacuum, rotated by 180°, transferred to the press fitting part, and press-fit onto the shaft by the cylinder. The head rotates by -180° to return to the suction part to pick up the next workpiece.
Target workpiece
Workpiece: washer Size: φ20, t0.5
Design Specifications
Operating Conditions or Design Requirements
Outer dimensions: W230 x D263 x H598mm Rotating angle:±180° Press fit stroke:8mm Suction head positioning time(when rotated by 180°)1Sec
Required Performance
Press fitting force: 40N or higher
Selection Criteria for Main Components
As the press fitting force is 40N or higher, a φ20 cylinder is selected. To achieve 180° rotation time of 1 second, a 100W motor is selected.
Design Evaluation
Verification of main components
Verify if the motor selected can satisfy the load inertia and load torque requirements.
Calculation of shaft-converted load inertia
Conditional value: inertia of reducer JMG = 0.051kg·cm², inertia of shaft JS = 4.705kg·m², inertia of coupling JC = 6.300kg·cm², inertia of rotary table JK = 198.4kg·cm², reduction ratio 1/nm = 1/21.
From shaft-converted load inertia JL = JMG + (JC + JK + JS) x (1/nm)², JL = 0.051 + (6.3 + 198.375 + 4.705) x (1/21)² = 0.526kg·cm². From inertia ratio m = JL/JM, m = 0.526/0.078 = 6.8 < 17 times (motor specification recommended value).
Calculation of torque during acceleration
Conditional value: efficiency of drive section η = 0.980, motor rotation speed N0 = 832.233r/min, acceleration time Tsa = 0.200s, motor shaft-converted load torque TL = 0.000N·m.
From torque during ascending acceleration TMa = ((((JL/η) + JM) x N0) / (9.55 x 10⁴ x Tsa)) + TL, TMa = ((((0.526 / 0.987) + 0.078) x 832.233) / (9.55 x 104 x 0.2)) + 0.000 = 0.027N·m.
The maximum torque is reached during acceleration, and as peak load rate Rp is obtained by Rp = (Tma / Ttyp) x 100, where rated torque Ttyp = 0.32N·m, Rp = (0.027/0.32) x 100 = 8.438%
If the actual load torque is calculated by calculating the torque during each operation pattern, 0.014N·m < 0.32N·m (rated torque).
Other Design Consideration
As the index table for feeding workpieces is arranged at a lower position, the mounting bracket for the motor is placed at the top of the mechanism. In addition, a servo motor is employed to address high speed requirements and the acceleration/deceleration.