(!) Since support from Microsoft will end on January 14th, 2020, Windows 7 will be excluded from the recommended environment from December 15th, 2019 on this site. Vì lý do Microsoft kết thúc hỗ trợ cho Windows 7 vào ngày 14/01/2020, Windows 7 sẽ là hệ điều hành không được khuyến khích sử dụng với trang web này từ ngày 15/12/2019.

ideanote
inCAD Library

Please read before use

What is inCAD Library?

  • Helpful application examples for mechanical engineers.

The Concept of inCAD Library

  • Online application library with a range of ideas for all manufacturing industries.
  • Save design time and learn new design applications when you are concepting new machines.

Disclaimer

  • MISUMI may not offer all parts in each application design. Available parts can only be purchased separately not as a unit shown in each application design.
  • MISUMI does not guarantee quality, accuracy, functionality, safety or reliability for the combination of the parts in each application example. Accept these points prior to use.
  • 2014 Copyright MISUMI
  • The data cannot be used for any purposes (including sales promotion) except for designing your machine.
  • All associated CAD is free. Misumi reserves the right at its sole discretion to cancel, terminate or modify this offer.
  • MISUMI may change, add or delete application examples posted without prior notice.
  • MISUMI assumes no responsibilities for any damage incurred resulting from your use of the Service or any change, addition or deletion by MISUMI of the application examples for any reason whatsoever.

inCAD Library Features

  1. Get great new design ideas for these application examples.
  2. Over 300 design application ideas
    collected from dozens of industries!

  3. Find application examples quickly! Search by function, workpiece shape, etc.

  4. Download the CAD models for each application example.
  5. Log in to download free CAD models.
    Download CAD for the entire application example!

Good IDEA! button

Click the Good IDEA! Button when you like an application example!

*Can only be clicked once per application example.

  • Upper right corner on the page of application example details

  • Pop-up dialog for CAD data downloading

Page top

Keyword Search
No. Search

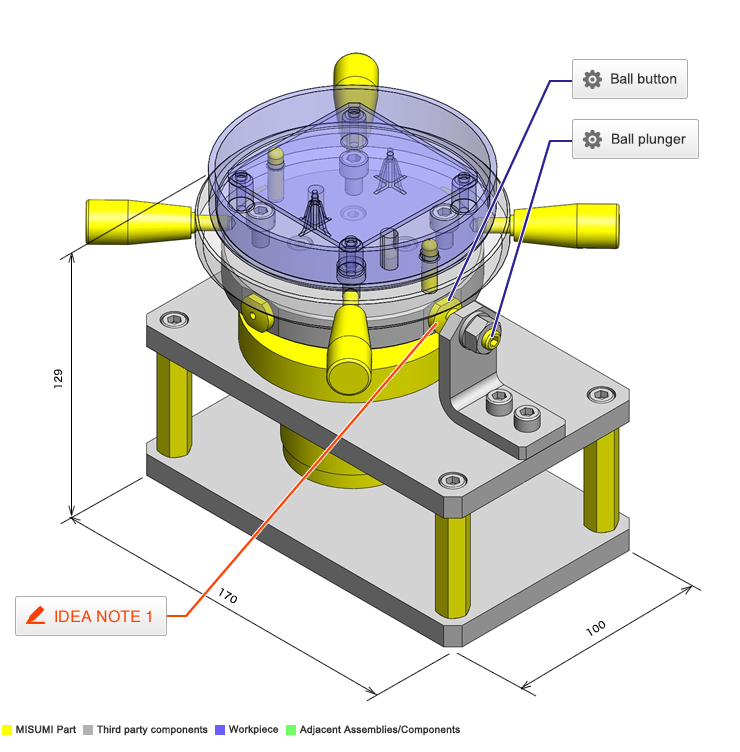
No.000042 Manually Indexed Rotary Table

Ball Buttons are used to prevent wear on the outside of the housing.

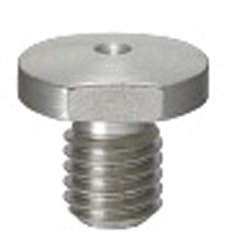
Ball button

Product name Ball Buttons- Tapped 
Part number TBBT8
* Orange colored cells in the table below indicate the part numbers used in this example.

Selection criteria

Contact is made at the retaining position, reducing wear on the outside body.

Back to page top

Risk info.

Some wear and dents.

Back to page top

Available sizes

■Ball button (Tap type)

Material: W1-9 Carbon Tool Steel (Hardness: 55~60HRC)
Surface treatment: Electroless nickel plating

Thread DIA.
(Coarse)
Thread
length
Button
O.D.
Button
height
M4 5 φ8 3
M5 6 φ9 3
M6 8 φ12 3
M8 10 φ15 4
M10 12 φ20 4
M12 15 φ22 4

* When combining with ball plungers, use the same thread DIA.

Back to page top

Accuracy Info

■Accuracy of Ball button (Tap type)

Concentricity of the thread and the notch: 0.1

Back to page top

Ball plunger

Product name Ball Plungers - Long 
Part number BPJL8
* Orange colored cells in the table below indicate the part numbers used in this example.

Selection criteria

Suitable for temporarily retaining the table in the preferred working position.

Back to page top

Available sizes

■Ball plunger (Long)

Ball material Load type Body Ball Spring
Material Hardness Surface treatment Material Hardness Material
Metal For extra light loads 1045 Carbon Steel 29-
35HRC
Black oxide 52100 Bearing Steel 55HRC- SWP−B
For light loads
For heavy loads 304 Stainless Steel
For extra heavy loads 1045 Carbon Steel 29-
35HRC
Nickel plating
Resin For extra light loads Black oxide Polyacetal -
For light loads
For heavy loads
For extra heavy loads Nickel plating

■Sizes and Dimensions

Thread DIA.(Coarse) Metal ball Plastic ball Body length
DIA. Stroke DIA. Stroke
M3 φ1.5 0.5 13
M4 φ2.5 0.8 φ2.4 0.7 15
M5 φ3 φ3 0.8 18
M6 φ3 φ3 0.8 20
M8 φ4 1 φ4 1 23
M10 φ5 1.2 φ5 1.2 27
M12 φ7.1 1.8 φ7 1.8 32
M16 φ9.5 2.5 φ9.5 2.5 40

*Plastic ball type for thread DIA. M3 is not available.

Back to page top

Performance info.

■Ball plunger (Long) spring load (N)

Thread DIA. (Coarse) For extra light loads For light loads For heavy loads For extra heavy loads
min. max. min. max. min. max. min. max.
M3 0.3 0.6 1.0 2.0 1.5 2.9 2.2 5.0
M4 0.6 1.6 2.0 4.9 3.9 9.8 2.5 12.6
M5 1.0 3.1 2.9 9.8 4.9 19.6 11.7 25.1
M6 1.6 4.9 4.9 14.7 9.8 29.4 18.7 35.3
M8 2.4 6.4 6.9 19.6 12.7 39.2 24.5 46.8
M10 3.0 8.1 8.8 24.5 18.6 49.0 26.7 58.7
M12 3.5 9.7 9.8 29.4 19.6 58.8 26.1 62.3
M16 5.7 15.8 15.7 49.0 29.4 98.0 55.4 116.0

*Load "min." is the initial load, and "max." is when the ball is fully depressed.

Back to page top

IDEA NOTE Protruding ball button provides stable clamping.

By the use of protruding ball buttons, rotary table retention force is adjustable, and wear dents are reduced.

IDEA NOTE 上段治具脱落防止

プレートをザグリ穴形状にし、六角支柱を嵌めることで上段の脱落を防止

  • TERMS AND CONDITIONS FOR USE OF CAD DATA
    Your access to the CAD data that MISUMI Corporation (hereinafter referred to as the Company) posts on this site (including 3D CAD data, intermediate 3D CAD data and 2D CAD data; hereinafter referred to as the Data) are of products manufactured and/or sold by the Company (hereinafter referred to as the Products) assumes that you have read and accepted these terms and conditions which govern your use of the Data. If you do not agree to these terms and conditions, you must stop using this website and the Data. You must not use the Data for any unlawful purpose or in any manner inconsistent with these terms and conditions.
    1. CAD Data
    The Data is prepared for assisting the Company's users in the CAD design process by providing dimensions and other Product information. In order to provide the best speed and stability working within this site, the Product drawings were simplified to reduce the size of the Data. For instance, some of the Products are shown without the oil groove shape, screws or spring shape. Also, please be aware that the tolerance, surface roughness and/or chamfer of the Data may vary from the actual Products.
    2. Disclaimer on Data
    While the Company has carefully prepared the Data, accuracy of the Data is not guaranteed and is subject to the variances as described above. The Company may also modify, add or delete the Data at any time without prior notice. The Company assumes no liability for any direct, indirect, consequential or special damages that you may claim resulted from your use of the Data or any changes to or deletions of the Data regardless of the reason. The Company provides no warranty as to the quality, accuracy, functionality, safety or reliability of the combination of Products and parts. Example applications and combinations of the Products are provided for illustrative purposes only.
    3. Copyright
    Copyrights to the content and the Data belong to the Company or the manufacturers of the Products. The said copyright is protected by the Copyright Act and international treaties. The use (including duplication, modification, uploading, posting, transmission, distribution, licensing, sales and publishing) of the Data except for the purpose to use the Data described above without prior approval of the Company is not allowed. The Data cannot be used for any purposes (including sales promotion) except for designing your machine. If you violate this provision or the laws or regulations, the Company may prohibit you from the use of the Data, the Company’s site and/or take legal action. So long as you comply with these terms and conditions, the Company grants to you a non-exclusive, non-transferable, revocable license to access and use the Data for the sole purpose of assisting you in designing machines that incorporate products.
    In case that the CAD data is found to have been to be used for any purpose other than mentioned above or against the related laws, MISUMI may take legal actions, including the one for blocking the involved user from using CAD data and from accessing to the MISUMI site.
    4. Disclaimer of Warranty
    ANY AND ALL CONTENT APPEARING ON THIS WEB SITE IS PROVIDED FOR INFORMATIONAL PURPOSES ONLY. THIS WEB SITE, ITS CONTENT AND ITS LINKS ARE PROVIDED ON AN "AS IS" AND "AS AVAILABLE" BASIS AND ARE USED ONLY AT YOUR SOLE RISK, TO THE FULLEST EXTENT PERMISSIBLE BY LAW. THE COMPANY DISCLAIMS ALL WARRANTIES, EXPRESS OR IMPLIED, OF ANY KIND, REGARDING THIS WEB SITE (INCLUDING ITS CONTENT, HARDWARE, SOFTWARE AND LINKS), INCLUDING AS TO FITNESS FOR A PARTICULAR PURPOSE, MERCHANTABILITY, TITLE, NON INFRINGEMENT, RESULTS, ACCURACY, COMPLETENESS, ACCESSIBILITY, COMPATIBILITY, SECURITY AND FREEDOM FROM COMPUTER VIRUS. THE COMPANY WILL NOT BE LIABLE FOR ANY DAMAGES OR LOSSES, INCLUDING DIRECT, INDIRECT, CONSEQUENTIAL, SPECIAL, INCIDENTAL OR PUNITIVE DAMAGES AND/OR LOST PROFITS, IN CONNECTION WITH USE OF THE INTERNET, THIS WEB SITE, ITS CONTENT OR ITS LINKS
    Further, the Company will not be liable to you for any failure or delay by the Company to provide access to the Data or any of its obligations under these terms and conditions where such failure or delay is the direct or indirect result of any circumstances beyond the Company's reasonable control (and the Company's obligations will be suspended for the duration of such circumstances).

    CAD Download (Unit Assembly)

    CAD Download: File Format
    生成

    Thank you for downloading the data.

    Click the Good IDEA! button when you find interesting design tips.


    This data is utilized in order to list more useful application examples in the future.

    CAD Data Limitations

    1. Assembly data shows the assembly drawings in the concept design phase. The sole purpose of the data is to explain the structure and functionality of the assembly and is not considered nor to be used as a final design.
      You will need to edit the Data so that it meets your specific design conditions.
    2. Unit assembly Data consists of some sub-assemblies.
      It is configured so that each sub-assembly unit can be used as it is or edited.
    3. * The part in the frame is a sub-assembly unit.

    4. The Data for fabricated parts is based on easy-to-edit dimensions and shapes in sketches and histories.
    5. The Data including the third-part components are made by the Company.

    Page top

  • * Unit assembly Data consists of some sub-assemblies.
       It is configured so that each sub-assembly unit can be used as it is or edited.

Application Overview

Purpose

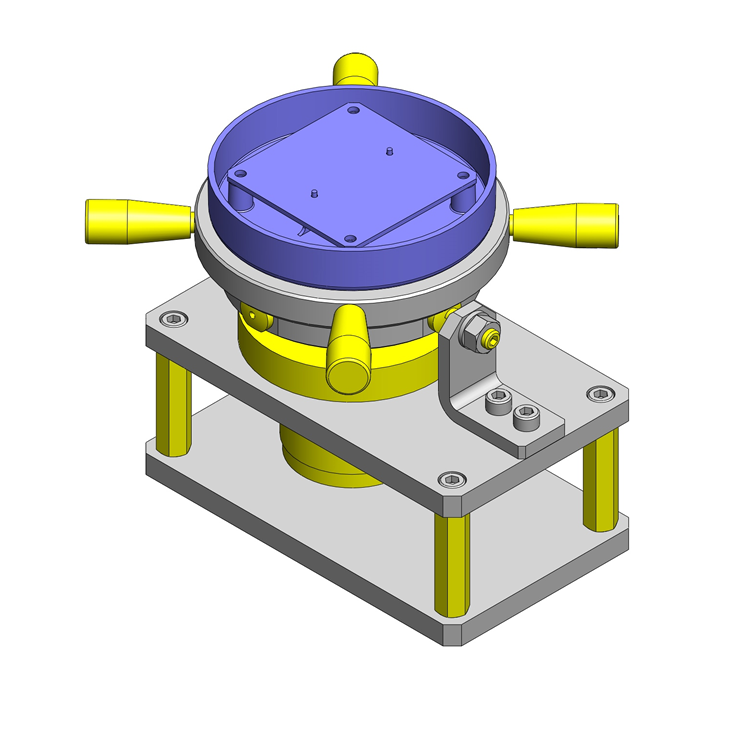
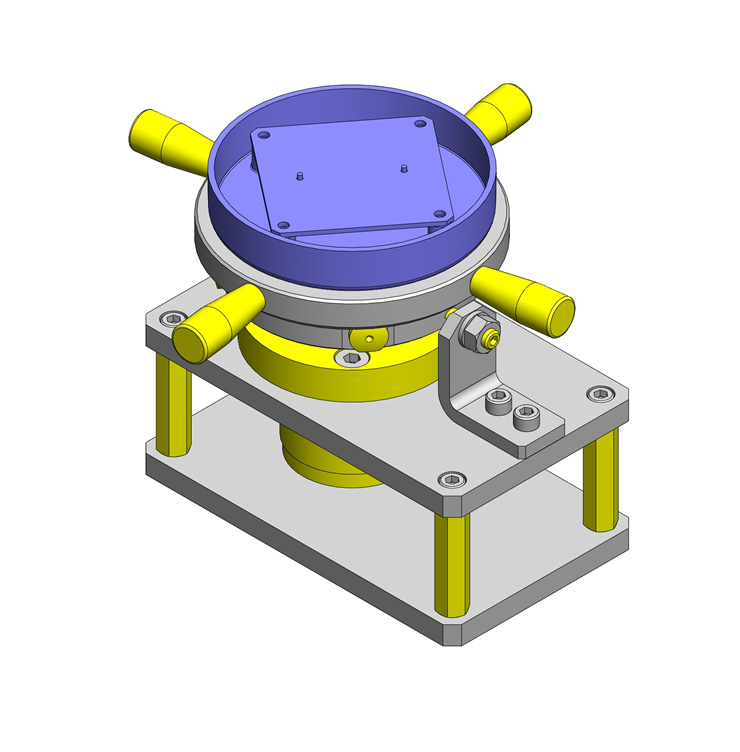
  • A manually indexed rotary table using a ball plunger and ball buttons.
  • Used for inspecting specific locations on a component with microscope.

Target workpiece

  • Plastic case
    Case dimensions: φ110 H20

Design Specifications

Operating Conditions or Design Requirements

  • External dims.: W100 x L170 x H129
  • Table O.D.: 120

Required Performance

  • Retaining force that withstands 10N of external force applied.

Selection Criteria for Main Components

  • For ease of adjustment, Long Ball Plunger is used in this application.

Design Evaluation

Verification of main components

  • Select a ball plunger capable of retaining a workpiece.
  • Ball plunger retention force calculations
    • V groove angle of the ball button is 45 degrees per side, and plunger setting load and operation force are the same.
      The retaining force with plunger setup for 0.078mm stroke (almost zero touch) is
      0.99N + 6.9N = 7.9N
    • Max. force to overcome the V groove is at the plunger stroke 0.75mm,
      9.525N+6.9N=16.425N
    • Distance from ball button groove edge to the rotation center is approx. 53mm,so the torque that it takes to overcome the V groove is approx. 16.425 × 0.053 = 0.87N・m (Actually a little more due to friction)
      When an external force 1.0kg (10N) applies to the center of handle (80mm from the center of rotation), the torque is 0.8N・m
      ⇒ BPJL8 where the retention force covers the load value is selected.

Other Design Consideration

  • A bearing holder is used to retain rotation.

Explore Similar Application Examples

Page - / -

Part List

No. Part Name Sample Picture MISUMI Part Number Quantity
1 Hex Posts - Both Ends Tapped LSBRK12-50 4
2 Bearings with Housings - Outer Ring Captured GBGCB6904ZZ-60 1
3 Metal Washers - T Dimension Configurable, Precision Class TWSSB25-8-5 1
4 Ball Buttons - Tapped TBBT8 4
5 Locating Pins - Straight, Sphere (Press Fit) SLPSQAG6-L20 4
6 Stationary Handle GRAMS6 4
7 Ball Plungers/Long BPJL8 1
  • The part list above only contains MISUMI parts.
    Part list download (CSV) includes MISUMI and third party components used in this example.
  • TERMS AND CONDITIONS FOR USE OF CAD DATA
    Your access to the CAD data that MISUMI Corporation (hereinafter referred to as the Company) posts on this site (including 3D CAD data, intermediate 3D CAD data and 2D CAD data; hereinafter referred to as the Data) are of products manufactured and/or sold by the Company (hereinafter referred to as the Products) assumes that you have read and accepted these terms and conditions which govern your use of the Data. If you do not agree to these terms and conditions, you must stop using this website and the Data. You must not use the Data for any unlawful purpose or in any manner inconsistent with these terms and conditions.
    1. CAD Data
    The Data is prepared for assisting the Company's users in the CAD design process by providing dimensions and other Product information. In order to provide the best speed and stability working within this site, the Product drawings were simplified to reduce the size of the Data. For instance, some of the Products are shown without the oil groove shape, screws or spring shape. Also, please be aware that the tolerance, surface roughness and/or chamfer of the Data may vary from the actual Products.
    2. Disclaimer on Data
    While the Company has carefully prepared the Data, accuracy of the Data is not guaranteed and is subject to the variances as described above. The Company may also modify, add or delete the Data at any time without prior notice. The Company assumes no liability for any direct, indirect, consequential or special damages that you may claim resulted from your use of the Data or any changes to or deletions of the Data regardless of the reason. The Company provides no warranty as to the quality, accuracy, functionality, safety or reliability of the combination of Products and parts. Example applications and combinations of the Products are provided for illustrative purposes only.
    3. Copyright
    Copyrights to the content and the Data belong to the Company or the manufacturers of the Products. The said copyright is protected by the Copyright Act and international treaties. The use (including duplication, modification, uploading, posting, transmission, distribution, licensing, sales and publishing) of the Data except for the purpose to use the Data described above without prior approval of the Company is not allowed. The Data cannot be used for any purposes (including sales promotion) except for designing your machine. If you violate this provision or the laws or regulations, the Company may prohibit you from the use of the Data, the Company’s site and/or take legal action. So long as you comply with these terms and conditions, the Company grants to you a non-exclusive, non-transferable, revocable license to access and use the Data for the sole purpose of assisting you in designing machines that incorporate products.
    In case that the CAD data is found to have been to be used for any purpose other than mentioned above or against the related laws, MISUMI may take legal actions, including the one for blocking the involved user from using CAD data and from accessing to the MISUMI site.
    4. Disclaimer of Warranty
    ANY AND ALL CONTENT APPEARING ON THIS WEB SITE IS PROVIDED FOR INFORMATIONAL PURPOSES ONLY. THIS WEB SITE, ITS CONTENT AND ITS LINKS ARE PROVIDED ON AN "AS IS" AND "AS AVAILABLE" BASIS AND ARE USED ONLY AT YOUR SOLE RISK, TO THE FULLEST EXTENT PERMISSIBLE BY LAW. THE COMPANY DISCLAIMS ALL WARRANTIES, EXPRESS OR IMPLIED, OF ANY KIND, REGARDING THIS WEB SITE (INCLUDING ITS CONTENT, HARDWARE, SOFTWARE AND LINKS), INCLUDING AS TO FITNESS FOR A PARTICULAR PURPOSE, MERCHANTABILITY, TITLE, NON INFRINGEMENT, RESULTS, ACCURACY, COMPLETENESS, ACCESSIBILITY, COMPATIBILITY, SECURITY AND FREEDOM FROM COMPUTER VIRUS. THE COMPANY WILL NOT BE LIABLE FOR ANY DAMAGES OR LOSSES, INCLUDING DIRECT, INDIRECT, CONSEQUENTIAL, SPECIAL, INCIDENTAL OR PUNITIVE DAMAGES AND/OR LOST PROFITS, IN CONNECTION WITH USE OF THE INTERNET, THIS WEB SITE, ITS CONTENT OR ITS LINKS
    Further, the Company will not be liable to you for any failure or delay by the Company to provide access to the Data or any of its obligations under these terms and conditions where such failure or delay is the direct or indirect result of any circumstances beyond the Company's reasonable control (and the Company's obligations will be suspended for the duration of such circumstances).

    CAD Download (Unit Assembly)

    CAD Download: File Format
    生成

    Thank you for downloading the data.

    Click the Good IDEA! button when you find interesting design tips.


    This data is utilized in order to list more useful application examples in the future.

    CAD Data Limitations

    1. Assembly data shows the assembly drawings in the concept design phase. The sole purpose of the data is to explain the structure and functionality of the assembly and is not considered nor to be used as a final design.
      You will need to edit the Data so that it meets your specific design conditions.
    2. Unit assembly Data consists of some sub-assemblies.
      It is configured so that each sub-assembly unit can be used as it is or edited.
    3. * The part in the frame is a sub-assembly unit.

    4. The Data for fabricated parts is based on easy-to-edit dimensions and shapes in sketches and histories.
    5. The Data including the third-part components are made by the Company.

    Page top

Page top