(!) Since support from Microsoft will end on January 14th, 2020, Windows 7 will be excluded from the recommended environment from December 15th, 2019 on this site. Vì lý do Microsoft kết thúc hỗ trợ cho Windows 7 vào ngày 14/01/2020, Windows 7 sẽ là hệ điều hành không được khuyến khích sử dụng với trang web này từ ngày 15/12/2019.

ideanote
inCAD Library

Please read before use

What is inCAD Library?

  • Helpful application examples for mechanical engineers.

The Concept of inCAD Library

  • Online application library with a range of ideas for all manufacturing industries.
  • Save design time and learn new design applications when you are concepting new machines.

Disclaimer

  • MISUMI may not offer all parts in each application design. Available parts can only be purchased separately not as a unit shown in each application design.
  • MISUMI does not guarantee quality, accuracy, functionality, safety or reliability for the combination of the parts in each application example. Accept these points prior to use.
  • 2014 Copyright MISUMI
  • The data cannot be used for any purposes (including sales promotion) except for designing your machine.
  • All associated CAD is free. Misumi reserves the right at its sole discretion to cancel, terminate or modify this offer.
  • MISUMI may change, add or delete application examples posted without prior notice.
  • MISUMI assumes no responsibilities for any damage incurred resulting from your use of the Service or any change, addition or deletion by MISUMI of the application examples for any reason whatsoever.

inCAD Library Features

  1. Get great new design ideas for these application examples.
  2. Over 300 design application ideas
    collected from dozens of industries!

  3. Find application examples quickly! Search by function, workpiece shape, etc.

  4. Download the CAD models for each application example.
  5. Log in to download free CAD models.
    Download CAD for the entire application example!

Good IDEA! button

Click the Good IDEA! Button when you like an application example!

*Can only be clicked once per application example.

  • Upper right corner on the page of application example details

  • Pop-up dialog for CAD data downloading

Page top

Keyword Search
No. Search

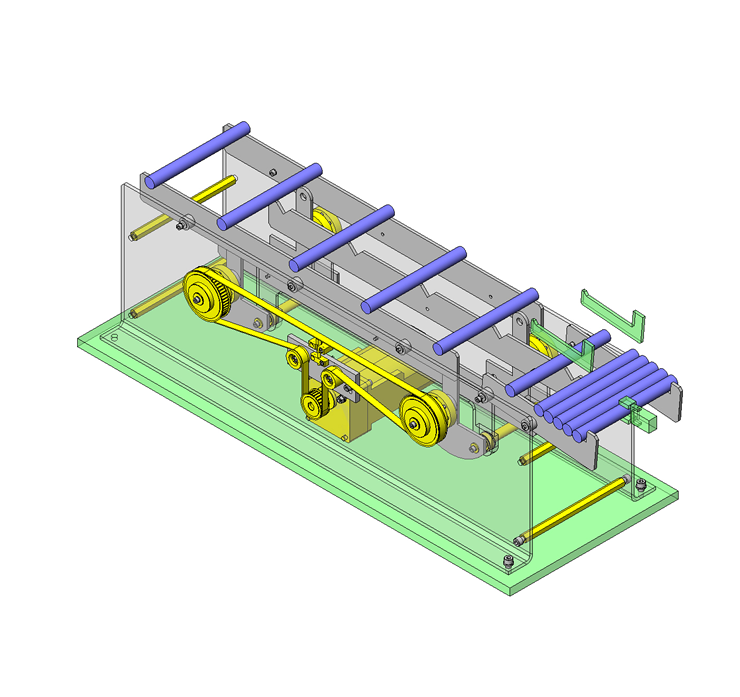
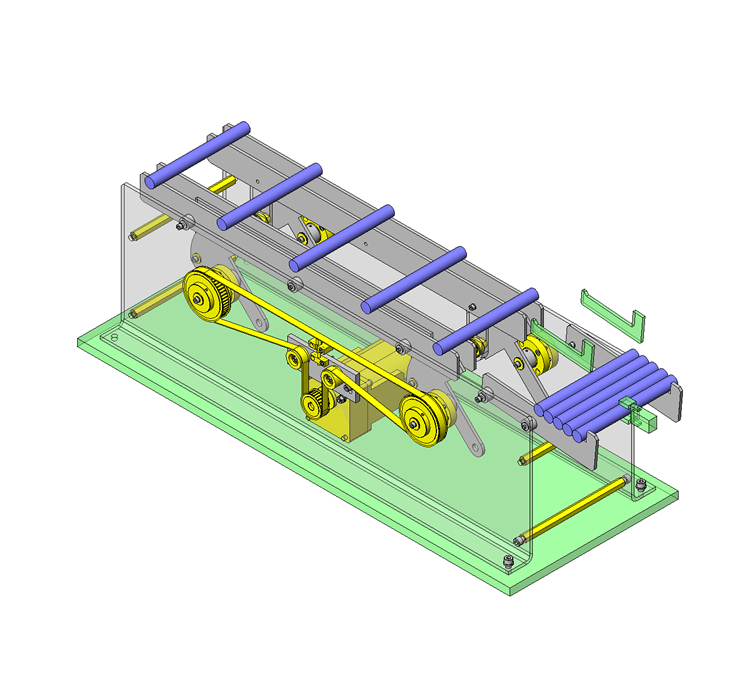
No.000149 Lifting and Carrying Mechanism

Lift and carry using a single actuator

Relevant category

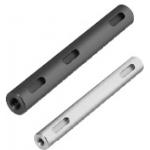
Rotary Shaft

Product name Rotary Shafts - Both Ends Tapped with Key Grooves
Part number PSFHKRW15-76-M5-N5-KA0-A25-KB56-B20
Features Tolerance Options: g6 (ground), h7 (ground) and h9 polished
* Orange colored cells in the table below indicate the part numbers used in this example.

Selection criteria

Economical

Back to page top

Available sizes

■Rotary Shaft (Both Ends Tapped, with Keyway Type)

O.D. tolerance Material Surface Treatment
h9 (Cold-drawn) 1045 Carbon Steel Black Oxide
Electroless Nickel Plating
304 Stainless Steel -
h7 (Ground) 1045 Carbon Steel Black Oxide
Electroless Nickel Plating
304 Stainless Steel -
g6 (Ground) 1045 Carbon Steel Black Oxide
Electroless Nickel Plating
304 Stainless Steel -

■Sizes

O.D. Tolerance O.D. Length
(Configure in 1mm increments)
h9 φ6 20.0~300.0
φ8 20.0~400.0
φ10 20.0~500.0
φ12 30.0~600.0
φ15 30.0~700.0
φ20 40.0~800.0
φ25 50.0~800.0
φ30 60.0~800.0
φ35 70.0~800.0
h7 φ6 20.0~300.0
φ8 20.0~400.0
φ10 20.0~500.0
φ12 30.0~600.0
φ15 30.0~700.0
φ20 40.0~800.0
φ25 50.0~800.0
φ30 60.0~800.0
φ35 70.0~800.0
φ40 80.0~800.0
φ50 100.0~800.0
g6 φ6 20.0~300.0
φ8 20.0~400.0
φ10 20.0~500.0
φ12 30.0~600.0
φ13 30.0~600.0
φ15 30.0~700.0
φ16 30.0~800.0
φ17 40.0~800.0
φ18 40.0~800.0
φ20 40.0~800.0
φ22 40.0~800.0
φ25 50.0~800.0
φ30 60.0~800.0
φ35 70.0~800.0
φ40 80.0~800.0
φ50 100.0~800.0

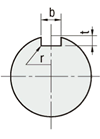
■Detailed Keyway Dimensions of Rotary Shaft

Shaft Dia. b t r
Reference Dim. Tolerance Reference Dim. Tolerance
6 2 -0.004
-0.029
1.2 +0.1
0
0.08~
0.16
8・10 3 1.8
12 4 0
-0.03
2.5
13~17 5 3.0 0.16~
0.25
18~22 6 3.5
25・30 8 0
-0.036
4.0 +0.2
0
35 10 5.0 0.25~
0.4
40 12 0
-0.043
5.0
50 14 5.5

Back to page top

Accuracy Info

■O.D. Tolerance Table

O.D. O.D. Tolerance
h9 h7 g6
φ6  0
-0.030
 0
-0.012
-0.004
-0.012
φ8  0
-0.036
 0
-0.015
-0.005
-0.014
φ10
φ12  0
-0.043
 0
-0.018
-0.006
-0.017
φ13 - -
φ15  0
-0.043
 0
-0.018
φ16 - -
φ17 - -
φ18 - -
φ20  0
-0.052
 0
-0.021
-0.007
-0.020
φ22 - -
φ25  0
-0.052
 0
-0.021
φ30
φ35  0
-0.062
 0
-0.025
-0.009
-0.025
φ40 -
φ50 -

Back to page top

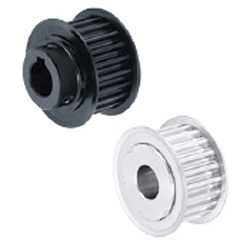
Timing Pulleys

Product name High Torque Timing Pulleys - 5GT
Part number GPA50GT5120-A-N15
Features Circular Tooth Profile Pulleys with minimal backlash, suitable for positioning.
* Orange colored cells in the table below indicate the part numbers used in this example.

Selection criteria

Effective for transmitting the driving force without slippage or speed changes

Back to page top

Available sizes

■Timing Pulleys (5GT Type)

Material Surface Treatment Accessory
Set Screw
Pulley Flange
2017 Aluminum Alloy
(Duralumin)
5052 Aluminum Alloy Clear Anodize 304 Stainless Steel
1045 Carbon Steel Low Carbon Steel Chromium-molybdenum steel
(Black Oxide)
Black Oxide

■Sizes and Dimensions

Number of teeth Nominal
Width
Pulley
Shape
Shaft Bore
Specs.
Shaft Bore Specs.(Configure in 1mm increments)
Straight Bore Straight Bore + Tap New JIS Keywayed Bore + Tap Stepped Holes - Stepped Holes
(Counterbore Holes on the Hub Side)
Both Ends Stepped Bore
Hole Dia. Hole Dia. Counterbore Hole Dia. Counterbore
Depth
Hole Dia. Counterbore Hole Dia. Counterbore
Depth
No Hub With Hub No Hub With Hub No Hub With Hub No Hub With Hub No Hub With Hub With Hub, without Hub No Hub No Hub No Hub
14 9


12


15
No Hub


With Hub
Straight Bore

Straight Bore
+Tap

New JIS
Keywayed Bore
+ Tap


Stepped Hole

Stepped Hole
(Counterbore Holes
on the Hub Side)

Both Ends
Stepped Bore
6-10 6-8 6-8 - - - 6 - 8 - (When no hub)
2.0 ≤
Counterbore depth
≤ Ridge width - 2.0


(When with hub)
2.0 ≤
Counterbore depth
≤ Full length - 2.0
6 8 3-14
Total of
counterbore depth
≤ Width - 3
15 6-10 6-10 6-8 6-8 6 8-10 8 6-8 8-10
16 6-12 6-12 6-10 6 8 6-10 6-8 8-12 8-10 6-10 8-12
18 6-14 6-14 6-13 6-9 8-10 6-10 6-10 8-12 8-12 6-12 8-14
20 6-16 8-15 8-14 8-10 8-12 8 8-14 8-13 10-16 10-15 8-14 10-16
22 8-19 8-19 8-17 8-12 8-12 8 8-17 8-14 10-19 10-16 8-17 10-19
24 8-22 8-22 8-18 8-16 8-14 8-10 8-20 8-16 10-23 10-18 8-20 10-22
25 8-22 8-22 8-20 8-16 8-16 8-12 8-20 8-18 10-23 10-20 8-20 10-22
26 10-27 10-24 10-21 10-16 10-17 10-13 10-25 10-20 12-27 12-22 10-25 12-27
28 10-27 10-27 10-24 10-20 10-19 10-15 10-25 10-25 12-27 12-27 10-25 12-27
30 10-28 10-28 10-26 10-22 10-20 10-16 10-26 10-26 12-28 12-28 10-26 12-28
32 10-32 10-30 10-30 10-22 10-23 10-17 10-30 10-26 12-32 12-28 10-30 12-32
34 12-37 12-32 12-32 12-24 12-26 12-18 12-35 12-28 14-37 14-30 12-35 14-37
36 12-37 12-34 12-34 12-26 12-30 12-20 12-35 12-30 14-37 14-32 12-35 14-37
40 12-42 12-36 12-36 12-26 12-30 12-22 12-40 12-32 14-42 14-34 12-40 14-42
44 12-50 12-38 12-42 12-26 12-30 12-23 12-48 12-34 14-50 14-36 12-48 14-50
48 12-55 12-42 12-45 12-30 12-30 12-26 12-53 12-38 14-55 14-38 12-53 14-55
50 12-59 12-42 12-45 12-30 12-30 12-27 12-57 12-38 14-59 14-40 12-57 14-59
60 12-72 12-44 12-45 12-30 12-30 12-30 12-70 12-40 14-72 14-42 12-70 14-72

Back to page top

Selection steps

■Timing pulley selection steps

* Select the timing belt together with the timing pulley.

The automated selection tool is available

http://fawos.misumi.jp/FA_WEB/pulley_us/

Determine Operating Conditions
Designed power, rotational speed, rotation ratio, interim shaft distance, motion pattern, etc.

Belt selection
Belt type/Belt width

Verify Specifications
  • Confirmation of calculated shaft distance, etc.
  • Confirmation of belt tension and load

Back to page top

Accuracy Info

■Shaft Bore Dia. of Timing Pulley

Shaft Bore Dia. Tolerance
(H7)
6-10 +0.015
 0
10-18 +0.018
 0
18-30 +0.021
 0
30-50 +0.025
 0
50-80 +0.030
 0

Back to page top

Motors with Electromagnetic Brake

Motors with Electromagnetic Brake
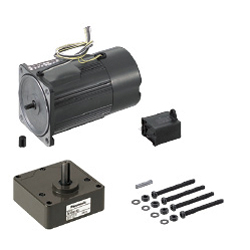
Product name Small gearhead motor with electromagnetic brake
Part number PACMB90-W40-V100
* Orange colored cells in the table below indicate the part numbers used in this example.

Selection criteria

Effective for the equipment requiring strong brake force or heavy load

Back to page top

Available sizes

■Motors with Electromagnetic Brake

Type Outer Dimensions Output (W) Voltage (V) Shaft Length Gear Head Length Motor Length
Single-phase
3-Phase
60 6 100 32 26 75
200
70 15 100 30 80
200
80 25 100 30 85
200
90 40 100 37 105
200
60 100 38 50 120
200
90 100 130
200

The 3-phase motor can be used in 220 V.

Back to page top

Selection steps

■Small geared motor selection steps

Determination of the Driving Facility
Specify the driving facility and overall dimensions, then check required conditions for the driving facility, such as the mass and travel speed of the material to be transferred.

Calculation of rotational speed and load
Calculate the load torque, loading moment of inertia and rotational speed at the motor driving shaft.

Confirmation of Required Specifications
Confirm the required specifications, position accuracies, position holding, speed ranges, operating environment, and environmental resistance, etc. at the drive section and equipment.

Motor Model Selection
Select the models most suitable for the required specifications.

Interim Selection of Motor and Gearhead
Select motor and gearhead candidates based on calculated rotational speeds, load torque and inertia values as well as the selected motor models.

Confirmation of the Selected Motor
Finalize the selection by confirming that all the specifications of the motor and the gearhead adequately meet the requirements.

Back to page top

Performance info.

■Small Size Geared Motor (Speed, Load)

Type Outer Dimensions Output (W) Voltage (V) 50Hz 60Hz
Rated Starting Torque
(N·m)
Rated Starting Torque
(N·m)
Rotational Speed
(r/min)
Torque
(N·m)
Rotational Speed
(r/min)
Torque
(N·m)
Single-phase 60 6 100 1300 0.044 0.056 1600 0.035 0.056
200 1300 0.044 0.056 1600 0.035 0.056
70 15 100 1300 0.11 0.10 1600 0.088 0.10
200 1300 0.11 0.10 1600 0.088 0.10
80 25 100 1300 0.19 0.20 1600 0.16 0.20
200 1300 0.19 0.20 1600 0.16 0.20
90 40 100 1300 0.29 0.32 1625 0.24 0.32
200 1300 0.29 0.32 1625 0.24 0.32
60 100 1275 0.45 0.57 1600 0.36 0.57
200 1275 0.45 0.57 1600 0.36 0.57
90 100 1225 0.7 0.68 1525 0.56 0.70
200 1225 0.7 0.68 1525 0.56 0.70
Type Outer Dimensions Output (W) Voltage (V) 50Hz 60Hz
Rated Starting Torque
(N·m)
Rated Starting Torque
(N·m)
Rotational Speed
(r/min)
Torque
(N·m)
Rotational Speed
(r/min)
Torque
(N·m)
3-Phase 80 25 200 1350 0.18 0.54 1625 0.15 0.4
1375 0.18 0.66 1650 0.15 0.5
90 40 1350 0.28 0.72 1625 0.24 0.51
1375 0.27 0.88 1675 0.23 0.63
60 1350 0.42 1.0 1625 0.35 0.69
1375 0.41 1.2 1650 0.34 0.87
90 1350 0.63 1.6 1625 0.53 1.1
1400 0.62 2.0 1650 0.52 1.4

Back to page top

Technical Calculations

■Technical Calculations for Electromagnetic Brake Motors

Outline of Small Size Geared Motor

Back to page top

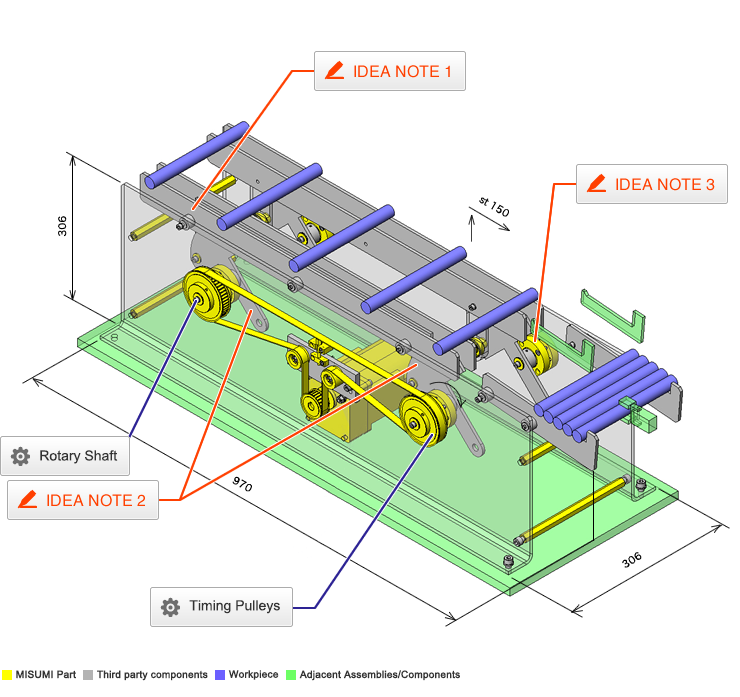
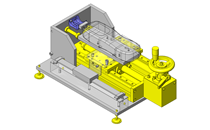
IDEA NOTE Fixed feed rate using AC motor

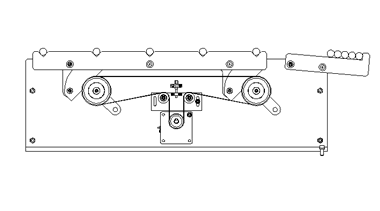
A fixed feed rate is achieved using an AC motor and positioning grooves for the workpieces.

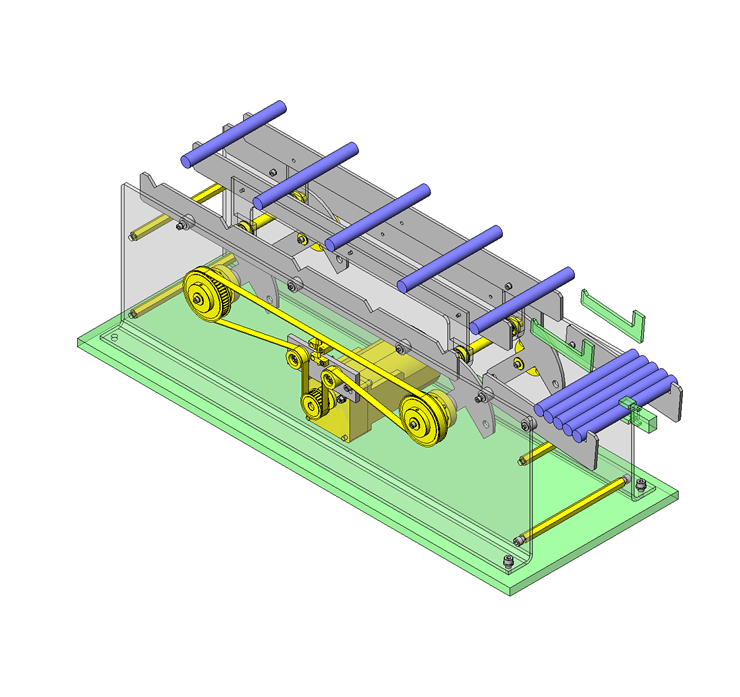
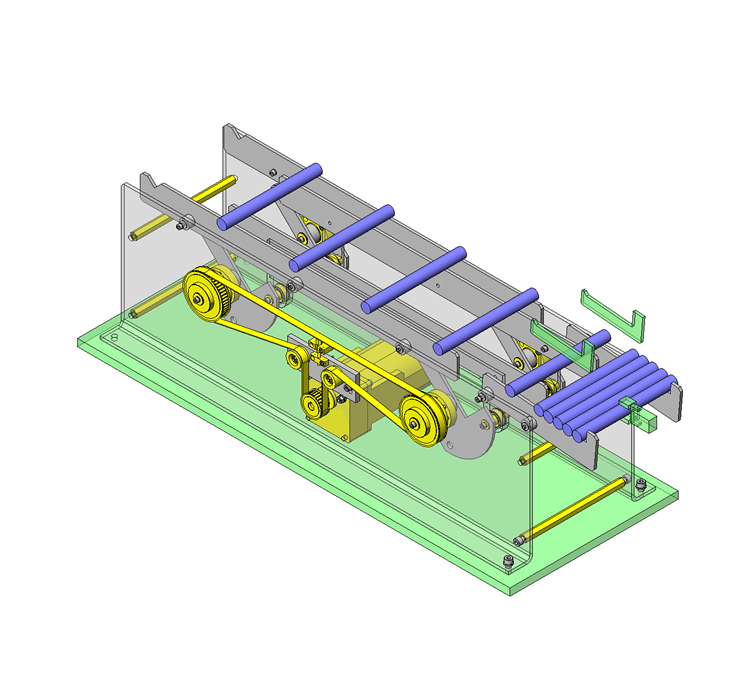
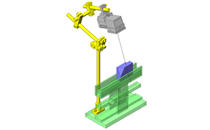
IDEA NOTE A single actuator creates lifting and carrying motions.

A parallel link structure is made by linking two eccentric shafts.

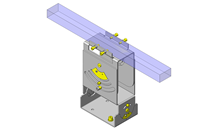
IDEA NOTE Dual single bearings

Two single bearing holders are mounted on either side of the thin plate, to serve as a double bearing.

  • TERMS AND CONDITIONS FOR USE OF CAD DATA
    Your access to the CAD data that MISUMI Corporation (hereinafter referred to as the Company) posts on this site (including 3D CAD data, intermediate 3D CAD data and 2D CAD data; hereinafter referred to as the Data) are of products manufactured and/or sold by the Company (hereinafter referred to as the Products) assumes that you have read and accepted these terms and conditions which govern your use of the Data. If you do not agree to these terms and conditions, you must stop using this website and the Data. You must not use the Data for any unlawful purpose or in any manner inconsistent with these terms and conditions.
    1. CAD Data
    The Data is prepared for assisting the Company's users in the CAD design process by providing dimensions and other Product information. In order to provide the best speed and stability working within this site, the Product drawings were simplified to reduce the size of the Data. For instance, some of the Products are shown without the oil groove shape, screws or spring shape. Also, please be aware that the tolerance, surface roughness and/or chamfer of the Data may vary from the actual Products.
    2. Disclaimer on Data
    While the Company has carefully prepared the Data, accuracy of the Data is not guaranteed and is subject to the variances as described above. The Company may also modify, add or delete the Data at any time without prior notice. The Company assumes no liability for any direct, indirect, consequential or special damages that you may claim resulted from your use of the Data or any changes to or deletions of the Data regardless of the reason. The Company provides no warranty as to the quality, accuracy, functionality, safety or reliability of the combination of Products and parts. Example applications and combinations of the Products are provided for illustrative purposes only.
    3. Copyright
    Copyrights to the content and the Data belong to the Company or the manufacturers of the Products. The said copyright is protected by the Copyright Act and international treaties. The use (including duplication, modification, uploading, posting, transmission, distribution, licensing, sales and publishing) of the Data except for the purpose to use the Data described above without prior approval of the Company is not allowed. The Data cannot be used for any purposes (including sales promotion) except for designing your machine. If you violate this provision or the laws or regulations, the Company may prohibit you from the use of the Data, the Company’s site and/or take legal action. So long as you comply with these terms and conditions, the Company grants to you a non-exclusive, non-transferable, revocable license to access and use the Data for the sole purpose of assisting you in designing machines that incorporate products.
    In case that the CAD data is found to have been to be used for any purpose other than mentioned above or against the related laws, MISUMI may take legal actions, including the one for blocking the involved user from using CAD data and from accessing to the MISUMI site.
    4. Disclaimer of Warranty
    ANY AND ALL CONTENT APPEARING ON THIS WEB SITE IS PROVIDED FOR INFORMATIONAL PURPOSES ONLY. THIS WEB SITE, ITS CONTENT AND ITS LINKS ARE PROVIDED ON AN "AS IS" AND "AS AVAILABLE" BASIS AND ARE USED ONLY AT YOUR SOLE RISK, TO THE FULLEST EXTENT PERMISSIBLE BY LAW. THE COMPANY DISCLAIMS ALL WARRANTIES, EXPRESS OR IMPLIED, OF ANY KIND, REGARDING THIS WEB SITE (INCLUDING ITS CONTENT, HARDWARE, SOFTWARE AND LINKS), INCLUDING AS TO FITNESS FOR A PARTICULAR PURPOSE, MERCHANTABILITY, TITLE, NON INFRINGEMENT, RESULTS, ACCURACY, COMPLETENESS, ACCESSIBILITY, COMPATIBILITY, SECURITY AND FREEDOM FROM COMPUTER VIRUS. THE COMPANY WILL NOT BE LIABLE FOR ANY DAMAGES OR LOSSES, INCLUDING DIRECT, INDIRECT, CONSEQUENTIAL, SPECIAL, INCIDENTAL OR PUNITIVE DAMAGES AND/OR LOST PROFITS, IN CONNECTION WITH USE OF THE INTERNET, THIS WEB SITE, ITS CONTENT OR ITS LINKS
    Further, the Company will not be liable to you for any failure or delay by the Company to provide access to the Data or any of its obligations under these terms and conditions where such failure or delay is the direct or indirect result of any circumstances beyond the Company's reasonable control (and the Company's obligations will be suspended for the duration of such circumstances).

    CAD Download (Unit Assembly)

    CAD Download: File Format
    生成

    Thank you for downloading the data.

    Click the Good IDEA! button when you find interesting design tips.


    This data is utilized in order to list more useful application examples in the future.

    CAD Data Limitations

    1. Assembly data shows the assembly drawings in the concept design phase. The sole purpose of the data is to explain the structure and functionality of the assembly and is not considered nor to be used as a final design.
      You will need to edit the Data so that it meets your specific design conditions.
    2. Unit assembly Data consists of some sub-assemblies.
      It is configured so that each sub-assembly unit can be used as it is or edited.
    3. * The part in the frame is a sub-assembly unit.

    4. The Data for fabricated parts is based on easy-to-edit dimensions and shapes in sketches and histories.
    5. The Data including the third-part components are made by the Company.

    Page top

  • * Unit assembly Data consists of some sub-assemblies.
       It is configured so that each sub-assembly unit can be used as it is or edited.

Application Overview

Purpose

  • Purpose
    • To feed cylinder-shaped workpieces at a fixed rate.

Target workpiece

  • Shape: aluminum cylinder part
  • Size: φ20 x 200 mm
  • Weight: 0.15 kg

Design Specifications

Operating Conditions or Design Requirements

  • Distance between grooves: 150 mm
  • Movement speed: 1 sec./pitch
  • Outer dimensions: W970 x D306 x H306 mm

Selection Criteria for Main Components

  • Timing belt is used to drive two eccentric shafts.

Design Evaluation

Verification of main components

  • Select motor based on load torque and moment of inertia.
    • Selection of AC Motor: Calculations.
    • Select gear ratio based on workpiece movement time.
    • Conditional value: movement time per stroke = approx. 1.0sec., motor rotation speed = 1,300rpm, timing pulley ratio = 50:25 = 2:1
    • 60 x gear ratio x 2/1.0 ≈ motor rotation speed Therefore, from gear ratio ≈ (1,300 x 1.0)/(2 x 60) = 10.8, select 1:10 for the gear ratio (i) of gearhead.
    • Calculation of load torque
    • Conditional value: g = 9.807 (m/s²), m = 2 (kg), η = 0.81, r = 0.075m
    • From T'm = F·r/η and F = m·g,
      T'm = 2×9.807×0.075/0.81 = 1.816N・m
      Considering safety factor Sf = 2 and pulley ratio, the load torque Tm is:
      Tm = T'm×Sf/2 = 1.816×2/2 = 1.816N・m
    • Check moment of inertia
      Moment of inertia applied to large belt pulley: J1 = 1.8162 x 10-²kg·m²
      Moment of inertia of small belt pulley: J2 = 1.3312 x 10-⁵kg·m²
      From moment of inertia applied to small belt pulley: Jd = J2 + J1 (b/a)2 (b/a = pulley ratio), Jd = 1.3312 x 10-⁵ + 1.8162 x 10-² x (25/50)² = 4.554 x 10⁻³kg·m²
      Moment of inertia in motor shaft is, from Jm = Jd·(1/i)2,
      Jm = 4.554 x 10-3 x (1/10)² = 4.554 x 10-⁵ (kg·m²) = 0.455kg·cm²
    • From allowable moment of inertia of PACMB90-40W-100V = 0.735 (kg·cm²) and allowable torque of ACMGX90-10 = 2.25 (N·m), 0.735 (kg·cm²) > 0.455 (kg·cm²), 2.25 (N·m) > 1.816 (N·m) 
      -> Specifications are satisfied.

Other Design Consideration

  • The cover of the timing belt is omitted from this drawing for illustrative reasons. For the actual machine, a cover should be include for safety and dust prevention purposes.

Explore Similar Application Examples

Page - / -

Part List

No. Part Name Sample Picture MISUMI Part Number Quantity
1 Rotary Shafts - Both Ends Stepped, One End Threaded / Both Ends Stepped, One End Threaded, One End Tapped PSFHKRW15-76-M5-N5-KA0-A25-KB56-B20 2
2 Rotary Shafts - Both Ends Stepped, One End Threaded / Both Ends Stepped, One End Threaded, One End Tapped PSFHKRW15-47-M5-N5-KA0-A20 2
3 Driving Shafts - Shouldered PSFRHH15-100-F24-P12-T24-M5 2
4 Bearings with Housings - Standard with Pilot, Retained BGRR6002ZZ 8
5 Deep Groove/Double Shielded B6001ZZ 4
6 Metal Washers - Thickness +-0.10 & +-0.01 mm/Dimensions Configurable FWSSM-D21-V15-T6 4
7 Metal Washers - Thickness +-0.10 & +-0.01 mm/Dimensions Configurable FWSSM-D21-V15-T4 6
8 Metal Washers - T Dimension Configurable, Precision Class WSSM20-5-2 8
9 Metal Washers - T Dimension Configurable, Precision Class WSSM16-5-2 4
10 Metal Collar - Precision Grade, Dimension Configurable FNCLM-V12-D16-L12 4
11 High Torque Timing Pulleys - 5GT Type GPA50GT5120-A-N15 2
12 High Torque Timing Pulleys - 5GT Type GPA25GT5120-B-N12 1
13 Timing Belts/Super High Torque/EV5GT GBN1330EV5GT-120 1
14 Gear Motors PACMB90-W40-V100 1
15 Small Geared Motors - Induction Motors / Reversible Motors PACMGX90-10 1
16 Cantilever Shafts - Screw Mount with Threaded End - Stepped FXJC8-10-F5-MA5 2
17 Idler - Belt Backside Tensioning - Center Bearing AFBD19-30 2
18 Threaded Stopper Blocks/Counterbored Hole/Fine Thread/Coarse Thread TSBE5-5 1
19 Blocks for Adjusting Bolts/Standard Type AJKBM5-13 1
20 Adjusting Bolts/Hex/Coarse/Fine AJSTM5-25 1
21 Hex Posts - Both Ends Tapped PLSFB13-206 4
22 Parallel Keys KEG5-25 2
23 Parallel Keys KEG5-20 4
24 Retaining Rings/Internal/C-Type RTWN28 4
  • The part list above only contains MISUMI parts.
    Part list download (CSV) includes MISUMI and third party components used in this example.
  • TERMS AND CONDITIONS FOR USE OF CAD DATA
    Your access to the CAD data that MISUMI Corporation (hereinafter referred to as the Company) posts on this site (including 3D CAD data, intermediate 3D CAD data and 2D CAD data; hereinafter referred to as the Data) are of products manufactured and/or sold by the Company (hereinafter referred to as the Products) assumes that you have read and accepted these terms and conditions which govern your use of the Data. If you do not agree to these terms and conditions, you must stop using this website and the Data. You must not use the Data for any unlawful purpose or in any manner inconsistent with these terms and conditions.
    1. CAD Data
    The Data is prepared for assisting the Company's users in the CAD design process by providing dimensions and other Product information. In order to provide the best speed and stability working within this site, the Product drawings were simplified to reduce the size of the Data. For instance, some of the Products are shown without the oil groove shape, screws or spring shape. Also, please be aware that the tolerance, surface roughness and/or chamfer of the Data may vary from the actual Products.
    2. Disclaimer on Data
    While the Company has carefully prepared the Data, accuracy of the Data is not guaranteed and is subject to the variances as described above. The Company may also modify, add or delete the Data at any time without prior notice. The Company assumes no liability for any direct, indirect, consequential or special damages that you may claim resulted from your use of the Data or any changes to or deletions of the Data regardless of the reason. The Company provides no warranty as to the quality, accuracy, functionality, safety or reliability of the combination of Products and parts. Example applications and combinations of the Products are provided for illustrative purposes only.
    3. Copyright
    Copyrights to the content and the Data belong to the Company or the manufacturers of the Products. The said copyright is protected by the Copyright Act and international treaties. The use (including duplication, modification, uploading, posting, transmission, distribution, licensing, sales and publishing) of the Data except for the purpose to use the Data described above without prior approval of the Company is not allowed. The Data cannot be used for any purposes (including sales promotion) except for designing your machine. If you violate this provision or the laws or regulations, the Company may prohibit you from the use of the Data, the Company’s site and/or take legal action. So long as you comply with these terms and conditions, the Company grants to you a non-exclusive, non-transferable, revocable license to access and use the Data for the sole purpose of assisting you in designing machines that incorporate products.
    In case that the CAD data is found to have been to be used for any purpose other than mentioned above or against the related laws, MISUMI may take legal actions, including the one for blocking the involved user from using CAD data and from accessing to the MISUMI site.
    4. Disclaimer of Warranty
    ANY AND ALL CONTENT APPEARING ON THIS WEB SITE IS PROVIDED FOR INFORMATIONAL PURPOSES ONLY. THIS WEB SITE, ITS CONTENT AND ITS LINKS ARE PROVIDED ON AN "AS IS" AND "AS AVAILABLE" BASIS AND ARE USED ONLY AT YOUR SOLE RISK, TO THE FULLEST EXTENT PERMISSIBLE BY LAW. THE COMPANY DISCLAIMS ALL WARRANTIES, EXPRESS OR IMPLIED, OF ANY KIND, REGARDING THIS WEB SITE (INCLUDING ITS CONTENT, HARDWARE, SOFTWARE AND LINKS), INCLUDING AS TO FITNESS FOR A PARTICULAR PURPOSE, MERCHANTABILITY, TITLE, NON INFRINGEMENT, RESULTS, ACCURACY, COMPLETENESS, ACCESSIBILITY, COMPATIBILITY, SECURITY AND FREEDOM FROM COMPUTER VIRUS. THE COMPANY WILL NOT BE LIABLE FOR ANY DAMAGES OR LOSSES, INCLUDING DIRECT, INDIRECT, CONSEQUENTIAL, SPECIAL, INCIDENTAL OR PUNITIVE DAMAGES AND/OR LOST PROFITS, IN CONNECTION WITH USE OF THE INTERNET, THIS WEB SITE, ITS CONTENT OR ITS LINKS
    Further, the Company will not be liable to you for any failure or delay by the Company to provide access to the Data or any of its obligations under these terms and conditions where such failure or delay is the direct or indirect result of any circumstances beyond the Company's reasonable control (and the Company's obligations will be suspended for the duration of such circumstances).

    CAD Download (Unit Assembly)

    CAD Download: File Format
    生成

    Thank you for downloading the data.

    Click the Good IDEA! button when you find interesting design tips.


    This data is utilized in order to list more useful application examples in the future.

    CAD Data Limitations

    1. Assembly data shows the assembly drawings in the concept design phase. The sole purpose of the data is to explain the structure and functionality of the assembly and is not considered nor to be used as a final design.
      You will need to edit the Data so that it meets your specific design conditions.
    2. Unit assembly Data consists of some sub-assemblies.
      It is configured so that each sub-assembly unit can be used as it is or edited.
    3. * The part in the frame is a sub-assembly unit.

    4. The Data for fabricated parts is based on easy-to-edit dimensions and shapes in sketches and histories.
    5. The Data including the third-part components are made by the Company.

    Page top

Page top