(!) Since support from Microsoft will end on January 14th, 2020, Windows 7 will be excluded from the recommended environment from December 15th, 2019 on this site. Vì lý do Microsoft kết thúc hỗ trợ cho Windows 7 vào ngày 14/01/2020, Windows 7 sẽ là hệ điều hành không được khuyến khích sử dụng với trang web này từ ngày 15/12/2019.

ideanote
inCAD Library

Please read before use

What is inCAD Library?

  • Helpful application examples for mechanical engineers.

The Concept of inCAD Library

  • Online application library with a range of ideas for all manufacturing industries.
  • Save design time and learn new design applications when you are concepting new machines.

Disclaimer

  • MISUMI may not offer all parts in each application design. Available parts can only be purchased separately not as a unit shown in each application design.
  • MISUMI does not guarantee quality, accuracy, functionality, safety or reliability for the combination of the parts in each application example. Accept these points prior to use.
  • 2014 Copyright MISUMI
  • The data cannot be used for any purposes (including sales promotion) except for designing your machine.
  • All associated CAD is free. Misumi reserves the right at its sole discretion to cancel, terminate or modify this offer.
  • MISUMI may change, add or delete application examples posted without prior notice.
  • MISUMI assumes no responsibilities for any damage incurred resulting from your use of the Service or any change, addition or deletion by MISUMI of the application examples for any reason whatsoever.

inCAD Library Features

  1. Get great new design ideas for these application examples.
  2. Over 300 design application ideas
    collected from dozens of industries!

  3. Find application examples quickly! Search by function, workpiece shape, etc.

  4. Download the CAD models for each application example.
  5. Log in to download free CAD models.
    Download CAD for the entire application example!

Good IDEA! button

Click the Good IDEA! Button when you like an application example!

*Can only be clicked once per application example.

  • Upper right corner on the page of application example details

  • Pop-up dialog for CAD data downloading

Page top

Keyword Search
No. Search

No.000061 Retaining Mechanism

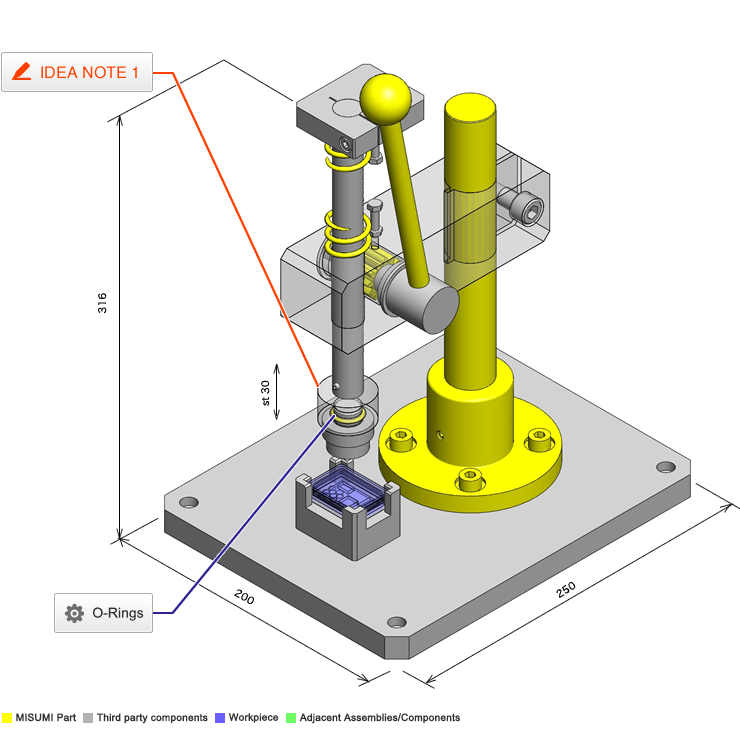
An O-ring is used for part retention.

Relevant category

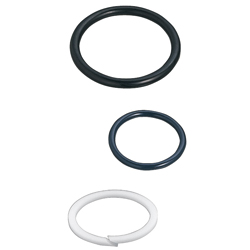
O-Rings

Product name O-Rings - P Series
Part number NPA15
* Orange colored cells in the table below indicate the part numbers used in this example.

Selection criteria

Used to create friction between assembly components.

Back to page top

Risk Info.

Wear and degradation can reduce retaining force

Back to page top

Available sizes

■O-Rings - P Series

Material Hardness
(JIS Hs)
Color Operable
Temperature Range
JIS Symbol Usage
Nitrile Rubber 70±5 Black -30-100℃ Class1A Mineral Oil Resistant
Nitrile Rubber 90±5 Black -25-100℃ Class1B Heat Resistant
Silicon Rubber 50±5 Milky White -50-200℃
Silicon Rubber 70±5 Navy -50-200℃ Class4C Heat Resistant
Fluororubber 70±5 Black -15-200℃ Class4D
Fluororubber 90±5 Black -15-200℃ Heat Resistant
Ethylene
Propylene Rubber
70±5 Black -45-130℃ Weather Resistant

Sizes and Dimensions(Excerpt)

JIS Nominal Number Ring I.D. Ring
Wire Dia.
Mating Side Dia.
Against O-ring
Internal Contact External Contact
P10 φ9.8 φ1.9 φ10 φ13
P10A φ9.8 φ2.4 φ10 φ14
P11 φ10.8 φ11 φ15
P11.2 φ11 φ11.2 φ15.2
P12 φ11.8 φ12 φ16
P12.5 φ12.3 φ12.5 φ16.5
P14 φ13.8 φ14 φ18
P15 φ14.8 φ15 φ19
P16 φ15.8 φ16 φ20
P18 φ17.8 φ18 φ22
P20 φ19.8 φ20 φ24
P21 φ20.8 φ21 φ25
P22 φ21.8 φ22 φ26
P22A φ21.7 φ3.5 φ22 φ28
P22.4 φ22.1 φ22.4 φ28.4
P24 φ23.7 φ24 φ30
P25 φ24.7 φ25 φ31
P25.5 φ25.2 φ25.5 φ31.5
P26 φ25.7 φ26 φ32
P28 φ27.7 φ28 φ34
P29 φ28.7 φ29 φ35
P29.5 φ29.2 φ29.5 φ35.5
P30 φ29.7 φ30 φ36

* Please see the product pages for other diameter rings.

Back to page top

Accuracy Info

■Accuracy of O-rings P Series

Ring Wire Dia. Tolerance:

Wire Dia. Tolerance
φ1.9 ±0.08
φ2.4 ±0.09
φ3.5 ±0.10
φ5.7 ±0.13

Parting Surface Burr Height: 0.1 or less
Parting Surface Burr Width: 0.15 or less

Ring I.D. Tolerance:

JIS Nominal Number Ring I.D. Tolerance
Nitrile Silicon
Ethylene
Fluorine
P10 φ9.8 ±0.17 ±0.25 ±0.20
P10A φ9.8
P11 φ10.8 ±0.18 ±0.27 ±0.21
P11.2 φ11
P12 φ11.8 ±0.19 ±0.28 ±0.22
P12.5 φ12.3
P14 φ13.8
P15 φ14.8 ±0.20 ±0.30 ±0.24
P16 φ15.8
P18 φ17.8 ±0.21 ±0.31 ±0.25
P20 φ19.8 ±0.22 ±0.33 ±0.26
P21 φ20.8 ±0.23 ±0.34 ±0.27
P22 φ21.8 ±0.24 ±0.36 ±0.28
P22A φ21.7
P22.4 φ22.1
P24 φ23.7
P25 φ24.7 ±0.25 ±0.37 ±0.30
P25.5 φ25.2
P26 φ25.7 ±0.26 ±0.39 ±0.31
P28 φ27.7 ±0.28 ±0.42 ±0.33
P29 φ28.7 ±0.29 ±0.43 ±0.34
P29.5 φ29.2
P30 φ29.7

Back to page top

Performance info.

■Operating Temperature Range of O-rings P Series

Material Hardness
(JIS Hs)
Color Operable
Temperature Range
Nitrile Rubber 70±5 Black -30-100℃
Nitrile Rubber 90±5 Black -25-100℃
Silicon Rubber 50±5 Milky White -50-200℃
Silicon Rubber 70±5 Navy -50-200℃
Fluororubber 70±5 Black -15-200℃
Fluororubber 90±5 Black -15-200℃
Ethylene
Propylene Rubber
70±5 Black -45-130℃

Back to page top

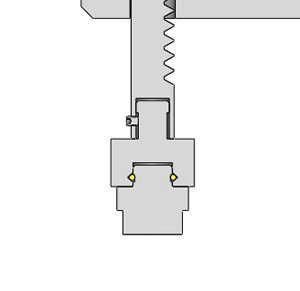
IDEA NOTE Idea on the O-ring groove

Since the O-ring is used as a resistant body, the groove on the fastening side has a rectangular shape and the groove on the loosening side is V shaped.

  • TERMS AND CONDITIONS FOR USE OF CAD DATA
    Your access to the CAD data that MISUMI Corporation (hereinafter referred to as the Company) posts on this site (including 3D CAD data, intermediate 3D CAD data and 2D CAD data; hereinafter referred to as the Data) are of products manufactured and/or sold by the Company (hereinafter referred to as the Products) assumes that you have read and accepted these terms and conditions which govern your use of the Data. If you do not agree to these terms and conditions, you must stop using this website and the Data. You must not use the Data for any unlawful purpose or in any manner inconsistent with these terms and conditions.
    1. CAD Data
    The Data is prepared for assisting the Company's users in the CAD design process by providing dimensions and other Product information. In order to provide the best speed and stability working within this site, the Product drawings were simplified to reduce the size of the Data. For instance, some of the Products are shown without the oil groove shape, screws or spring shape. Also, please be aware that the tolerance, surface roughness and/or chamfer of the Data may vary from the actual Products.
    2. Disclaimer on Data
    While the Company has carefully prepared the Data, accuracy of the Data is not guaranteed and is subject to the variances as described above. The Company may also modify, add or delete the Data at any time without prior notice. The Company assumes no liability for any direct, indirect, consequential or special damages that you may claim resulted from your use of the Data or any changes to or deletions of the Data regardless of the reason. The Company provides no warranty as to the quality, accuracy, functionality, safety or reliability of the combination of Products and parts. Example applications and combinations of the Products are provided for illustrative purposes only.
    3. Copyright
    Copyrights to the content and the Data belong to the Company or the manufacturers of the Products. The said copyright is protected by the Copyright Act and international treaties. The use (including duplication, modification, uploading, posting, transmission, distribution, licensing, sales and publishing) of the Data except for the purpose to use the Data described above without prior approval of the Company is not allowed. The Data cannot be used for any purposes (including sales promotion) except for designing your machine. If you violate this provision or the laws or regulations, the Company may prohibit you from the use of the Data, the Company’s site and/or take legal action. So long as you comply with these terms and conditions, the Company grants to you a non-exclusive, non-transferable, revocable license to access and use the Data for the sole purpose of assisting you in designing machines that incorporate products.
    In case that the CAD data is found to have been to be used for any purpose other than mentioned above or against the related laws, MISUMI may take legal actions, including the one for blocking the involved user from using CAD data and from accessing to the MISUMI site.
    4. Disclaimer of Warranty
    ANY AND ALL CONTENT APPEARING ON THIS WEB SITE IS PROVIDED FOR INFORMATIONAL PURPOSES ONLY. THIS WEB SITE, ITS CONTENT AND ITS LINKS ARE PROVIDED ON AN "AS IS" AND "AS AVAILABLE" BASIS AND ARE USED ONLY AT YOUR SOLE RISK, TO THE FULLEST EXTENT PERMISSIBLE BY LAW. THE COMPANY DISCLAIMS ALL WARRANTIES, EXPRESS OR IMPLIED, OF ANY KIND, REGARDING THIS WEB SITE (INCLUDING ITS CONTENT, HARDWARE, SOFTWARE AND LINKS), INCLUDING AS TO FITNESS FOR A PARTICULAR PURPOSE, MERCHANTABILITY, TITLE, NON INFRINGEMENT, RESULTS, ACCURACY, COMPLETENESS, ACCESSIBILITY, COMPATIBILITY, SECURITY AND FREEDOM FROM COMPUTER VIRUS. THE COMPANY WILL NOT BE LIABLE FOR ANY DAMAGES OR LOSSES, INCLUDING DIRECT, INDIRECT, CONSEQUENTIAL, SPECIAL, INCIDENTAL OR PUNITIVE DAMAGES AND/OR LOST PROFITS, IN CONNECTION WITH USE OF THE INTERNET, THIS WEB SITE, ITS CONTENT OR ITS LINKS
    Further, the Company will not be liable to you for any failure or delay by the Company to provide access to the Data or any of its obligations under these terms and conditions where such failure or delay is the direct or indirect result of any circumstances beyond the Company's reasonable control (and the Company's obligations will be suspended for the duration of such circumstances).

    CAD Download (Unit Assembly)

    CAD Download: File Format
    生成

    Thank you for downloading the data.

    Click the Good IDEA! button when you find interesting design tips.


    This data is utilized in order to list more useful application examples in the future.

    CAD Data Limitations

    1. Assembly data shows the assembly drawings in the concept design phase. The sole purpose of the data is to explain the structure and functionality of the assembly and is not considered nor to be used as a final design.
      You will need to edit the Data so that it meets your specific design conditions.
    2. Unit assembly Data consists of some sub-assemblies.
      It is configured so that each sub-assembly unit can be used as it is or edited.
    3. * The part in the frame is a sub-assembly unit.

    4. The Data for fabricated parts is based on easy-to-edit dimensions and shapes in sketches and histories.
    5. The Data including the third-part components are made by the Company.

    Page top

  • * Unit assembly Data consists of some sub-assemblies.
       It is configured so that each sub-assembly unit can be used as it is or edited.

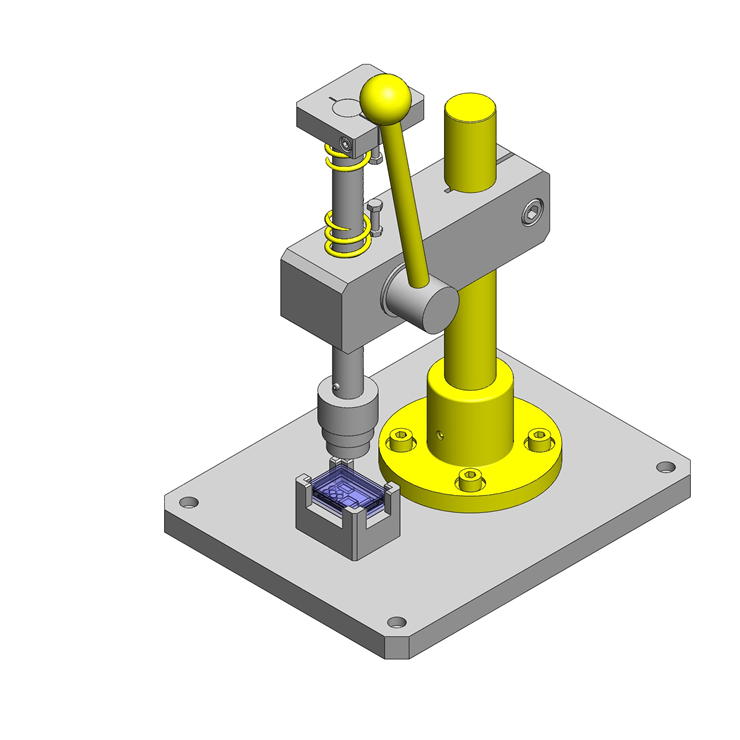
Application Overview

Purpose

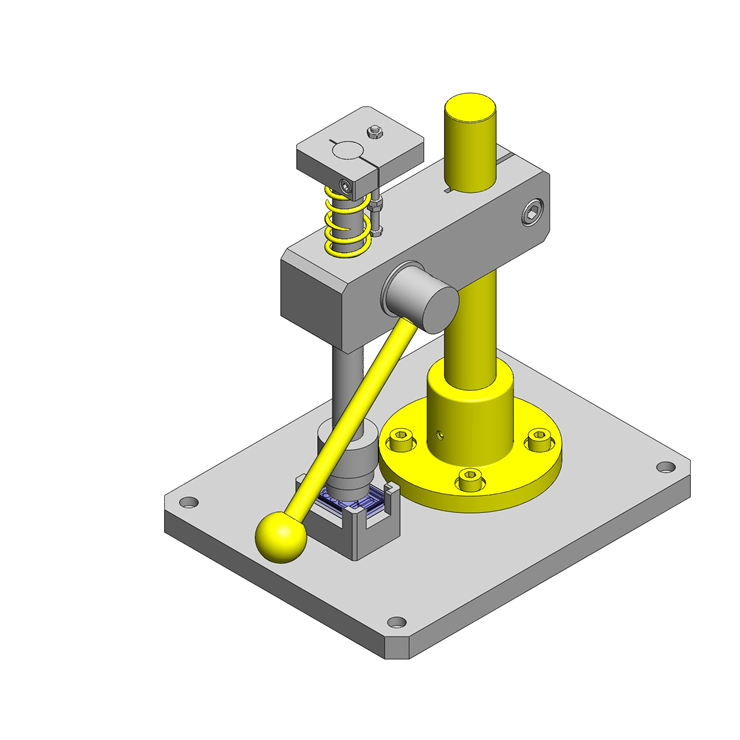
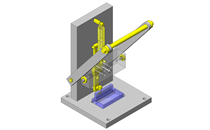
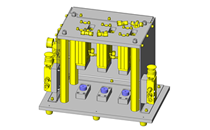
  • To press-fit caps into a plastic casing.

Points for use

  • Manual operation for small-quantity production.

Target workpiece

  • Plastic cap
  • Approximate workpiece size: 40X29X12mm

Design Specifications

Operating Conditions or Design Requirements

  • External dimensions: W200XD250XH316mm
  • Press fit stroke: 30mm

Required Performance

  • Pushing force: 50N or more
  • Operating load: 10N or less

Selection Criteria for Main Components

  • Device mounting stand
    • Select an economical shaft with a large diameter.

Design Evaluation

Verification of main components

  • Verify that the cap pressing force meets the required operating load.
  • Relationship between handle operating load and pushing force
    • Conditional values:
      Pinion pitch circle radius rm=24mm=0.024m
      Operating load Fs N
      Pushing force F N = 50N
      Pinion center - Operation point R m = 160mm = 0.16m
    • F N = Fs x R/r
      Operating load Fs = F/R × r Thus, Fs = 50/0.16 x 0.024 = 7.5N
      ⇒Meeting "Necessary operating load of 10N or less."

Other Design Consideration

  • For most O-ring applications, the groove shapes conform to JIS standards. However, different shapes are used for this application.

Explore Similar Application Examples

Page - / -

Part List

No. Part Name Sample Picture MISUMI Part Number Quantity
1 Device Stands - Round Flanged Set, Through Holes (Solid) CSTN30-250 1
2 Stationary Handles/with Cylindrical Knob LBGB10-160-B 1
3 Spur Gears, Pressure Angle 20° , Module 2.0 GEAKBB2.0-12-20-B-8N 1
4 Parallel Keys KES2-20 1
5 O-Rings/P Series NPA15 1
6 Round Wire Coil Springs/Deflection 35%-40%/O.D. Referenced WM27-100 1
  • The part list above only contains MISUMI parts.
    Part list download (CSV) includes MISUMI and third party components used in this example.
  • TERMS AND CONDITIONS FOR USE OF CAD DATA
    Your access to the CAD data that MISUMI Corporation (hereinafter referred to as the Company) posts on this site (including 3D CAD data, intermediate 3D CAD data and 2D CAD data; hereinafter referred to as the Data) are of products manufactured and/or sold by the Company (hereinafter referred to as the Products) assumes that you have read and accepted these terms and conditions which govern your use of the Data. If you do not agree to these terms and conditions, you must stop using this website and the Data. You must not use the Data for any unlawful purpose or in any manner inconsistent with these terms and conditions.
    1. CAD Data
    The Data is prepared for assisting the Company's users in the CAD design process by providing dimensions and other Product information. In order to provide the best speed and stability working within this site, the Product drawings were simplified to reduce the size of the Data. For instance, some of the Products are shown without the oil groove shape, screws or spring shape. Also, please be aware that the tolerance, surface roughness and/or chamfer of the Data may vary from the actual Products.
    2. Disclaimer on Data
    While the Company has carefully prepared the Data, accuracy of the Data is not guaranteed and is subject to the variances as described above. The Company may also modify, add or delete the Data at any time without prior notice. The Company assumes no liability for any direct, indirect, consequential or special damages that you may claim resulted from your use of the Data or any changes to or deletions of the Data regardless of the reason. The Company provides no warranty as to the quality, accuracy, functionality, safety or reliability of the combination of Products and parts. Example applications and combinations of the Products are provided for illustrative purposes only.
    3. Copyright
    Copyrights to the content and the Data belong to the Company or the manufacturers of the Products. The said copyright is protected by the Copyright Act and international treaties. The use (including duplication, modification, uploading, posting, transmission, distribution, licensing, sales and publishing) of the Data except for the purpose to use the Data described above without prior approval of the Company is not allowed. The Data cannot be used for any purposes (including sales promotion) except for designing your machine. If you violate this provision or the laws or regulations, the Company may prohibit you from the use of the Data, the Company’s site and/or take legal action. So long as you comply with these terms and conditions, the Company grants to you a non-exclusive, non-transferable, revocable license to access and use the Data for the sole purpose of assisting you in designing machines that incorporate products.
    In case that the CAD data is found to have been to be used for any purpose other than mentioned above or against the related laws, MISUMI may take legal actions, including the one for blocking the involved user from using CAD data and from accessing to the MISUMI site.
    4. Disclaimer of Warranty
    ANY AND ALL CONTENT APPEARING ON THIS WEB SITE IS PROVIDED FOR INFORMATIONAL PURPOSES ONLY. THIS WEB SITE, ITS CONTENT AND ITS LINKS ARE PROVIDED ON AN "AS IS" AND "AS AVAILABLE" BASIS AND ARE USED ONLY AT YOUR SOLE RISK, TO THE FULLEST EXTENT PERMISSIBLE BY LAW. THE COMPANY DISCLAIMS ALL WARRANTIES, EXPRESS OR IMPLIED, OF ANY KIND, REGARDING THIS WEB SITE (INCLUDING ITS CONTENT, HARDWARE, SOFTWARE AND LINKS), INCLUDING AS TO FITNESS FOR A PARTICULAR PURPOSE, MERCHANTABILITY, TITLE, NON INFRINGEMENT, RESULTS, ACCURACY, COMPLETENESS, ACCESSIBILITY, COMPATIBILITY, SECURITY AND FREEDOM FROM COMPUTER VIRUS. THE COMPANY WILL NOT BE LIABLE FOR ANY DAMAGES OR LOSSES, INCLUDING DIRECT, INDIRECT, CONSEQUENTIAL, SPECIAL, INCIDENTAL OR PUNITIVE DAMAGES AND/OR LOST PROFITS, IN CONNECTION WITH USE OF THE INTERNET, THIS WEB SITE, ITS CONTENT OR ITS LINKS
    Further, the Company will not be liable to you for any failure or delay by the Company to provide access to the Data or any of its obligations under these terms and conditions where such failure or delay is the direct or indirect result of any circumstances beyond the Company's reasonable control (and the Company's obligations will be suspended for the duration of such circumstances).

    CAD Download (Unit Assembly)

    CAD Download: File Format
    生成

    Thank you for downloading the data.

    Click the Good IDEA! button when you find interesting design tips.


    This data is utilized in order to list more useful application examples in the future.

    CAD Data Limitations

    1. Assembly data shows the assembly drawings in the concept design phase. The sole purpose of the data is to explain the structure and functionality of the assembly and is not considered nor to be used as a final design.
      You will need to edit the Data so that it meets your specific design conditions.
    2. Unit assembly Data consists of some sub-assemblies.
      It is configured so that each sub-assembly unit can be used as it is or edited.
    3. * The part in the frame is a sub-assembly unit.

    4. The Data for fabricated parts is based on easy-to-edit dimensions and shapes in sketches and histories.
    5. The Data including the third-part components are made by the Company.

    Page top

Page top