(!) Since support from Microsoft will end on January 14th, 2020, Windows 7 will be excluded from the recommended environment from December 15th, 2019 on this site. Vì lý do Microsoft kết thúc hỗ trợ cho Windows 7 vào ngày 14/01/2020, Windows 7 sẽ là hệ điều hành không được khuyến khích sử dụng với trang web này từ ngày 15/12/2019.
Search by Category / Brand Tìm theo danh mục, nhãn hiệu
Search by Category Tìm theo danh mục
- Scheduled Maintenance Notice: This site will be unavailable due to scheduled maintenance from 8:00 15/12/2024 to 5:00 (ICT) 16/12/2024. We apologize for the inconvenience.
- [Thông báo] Cập nhật địa chỉ kho tập kết hàng hóa tại khu vực miền Nam của MISUMI Việt Nam. Xem chi tiết.
[Announcement] Update on warehouse address in the Southern region of MISUIMI Vietnam. See more. - [Cảnh Báo] Thủ Đoạn Lừa Đảo Từ Nhân Viên Giao Hàng – Yêu Cầu Trả Phí Ship. Xem chi tiết.
[Warning] Fraud Calling from Shipper - Asking to Pay Shipping Fee. See more.
Specification/DimensionsĐặc điểm kỹ thuật / Kích thướcĐặc điểm kỹ thuật / Kích thước
-
Lead(mm)
-
Shaft Screw Overall Length L(mm)
-
type
- E-KBS
Days to ShipSố ngày giao hàng
-
- Alltất cả các
- 12 Day(s) or Less
Specify AlterationsChỉ định thay đổi
Precision Ball Screws Shaft Dia.40 Lead 5/10/20/40 Precision Grade C5 (Part Number)
You can add up to 6 items per a category to the compare list.
Brand :
MiSUMi Economy
Part Number :

Copy Part Number URL to Clipboard
The part number URL has been copied into your clipboard.-
- Order Qty :
-
-
- Price :
- ---
-
- Total Price :
- ---
-
- Days to ship :
- ---
Select part number to Order Now/ Add to Cart
- CAD Data unavailable
Product Description
RoHS Compliant Product
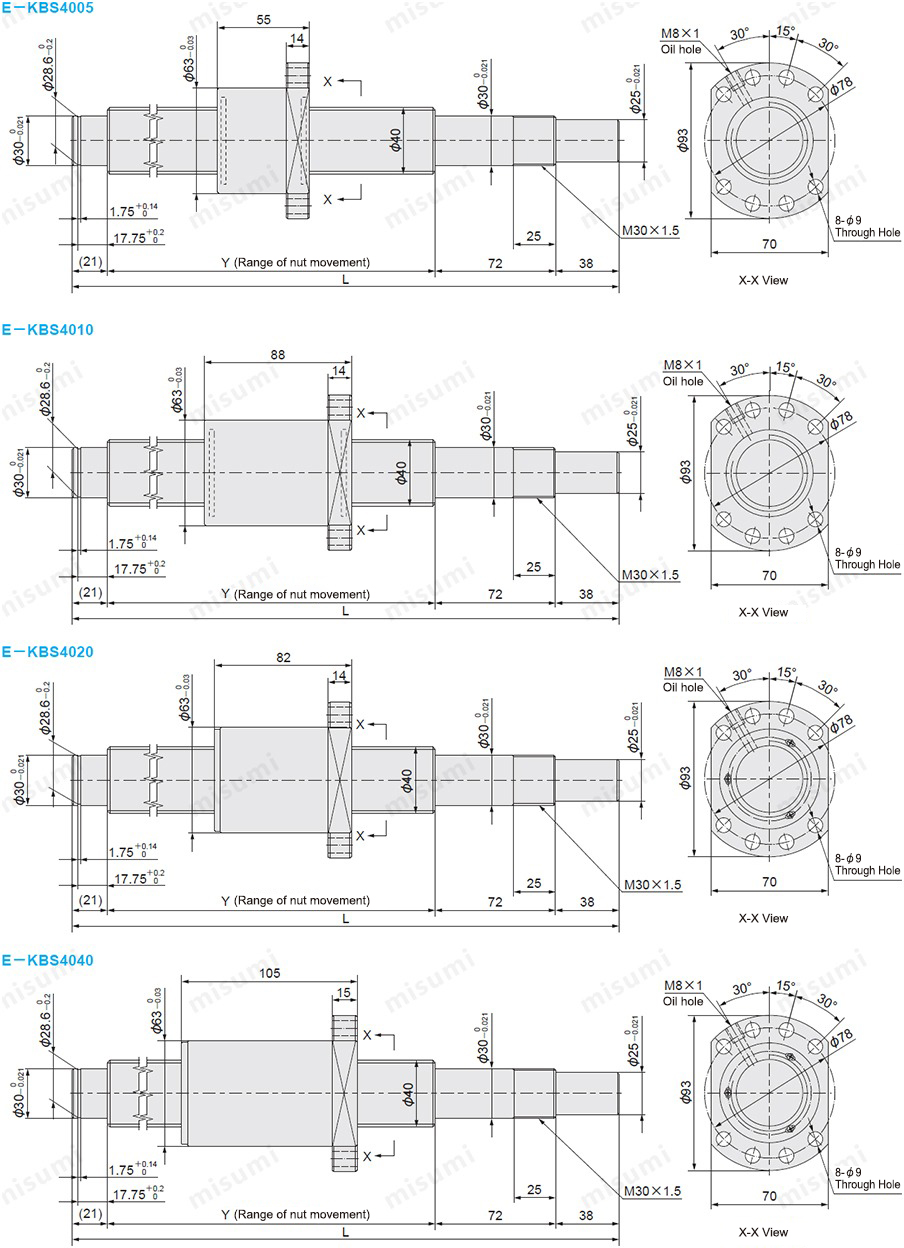

■Detailed dimension of alteration KC··KLC keyway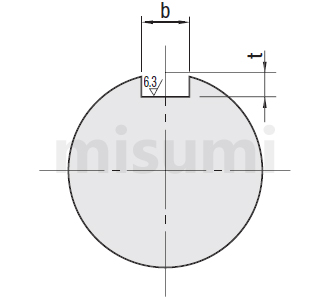
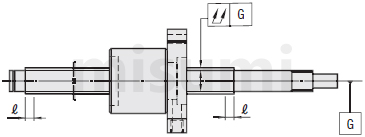
■Screw shaft runout tolerance
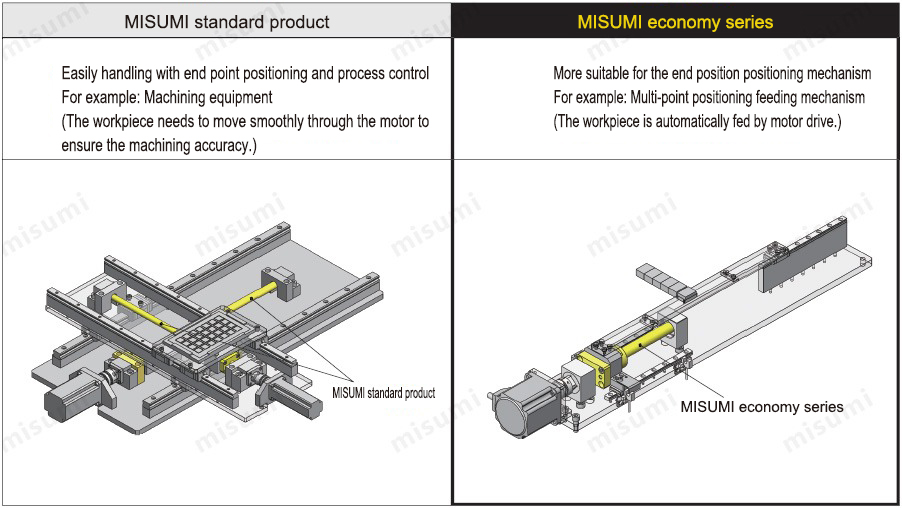
Product Overview
1. This series of products is the C5 Precision Ball Screw with the shaft diameter of 40 and lead of 5/10/20/40.
2. It is more suitable for positioning mechanisms in FA automation equipment.
3. The screw shaft end is machined according to standard specifications. If the shaft end requires alteration, it should be specified according to the catalog.
2. It is more suitable for positioning mechanisms in FA automation equipment.
3. The screw shaft end is machined according to standard specifications. If the shaft end requires alteration, it should be specified according to the catalog.
Dimensional Drawing
| Accuracy Grade | Screw Dia. | Lead | Screw Shaft | Nut | ||||
| Material | Hardness | Surface Treatment | Material | Hardness | Surface Treatment | |||
| C5 | 40 | 5·10·20·40 | Equivalent to S55C | Induction hardening 58~62HRC | - | Equivalent to SCM420 | Carburized 58~62HRC | - |

Specification Table
| Part Number |  Shaft overall length L (1mm increments) | Y | Number of Circuits | Basic Load Rating | Axial Clearance | Twisting Direction | |||
 Type Type |  Screw Shaft O.D. Screw Shaft O.D. |  Lead Lead | C (Dynamic) kN | C (Static) kN | |||||
| E-KBS | 40 | 05 | 300~2000 | L-131 | 4 turns | 10.5 | 39.5 | 0.05 or Less | Right |
| 10 | 27.9 | 77.5 | |||||||
| 20 | 2.8 turns | 19.7 | 53.5 | ||||||
| 40 | 1.8 turns | 10.2 | 33.2 | ||||||
| * The Y dimension must be larger than the full length of the nut | kgf=N×0.101972 | ||||||||
Alterations

 | Part Number ( Type· Type· Screw shaft outer diameter· Screw shaft outer diameter· Lead) Lead) | - |  L L | - | (NC·KC…etc.) |
E-KBS4005 | - | 400 | - | KC10 |
■Support side
 Only one of ①, ③, ④ and ⑤ can be selected.
 Only one of ⑦, ⑧ and ⑨ can be selected.
 Only one of ⑩ and ⑪ can be selected.
 When ⑫ and ⑬ are specified simultaneously, no male thread will be machined regardless of the value specified for U in ⑫.
 When specifying any alteration, the nut motion range (Y dimension) may become shorter. Please make sure that the nut motion range is greater than the full length of the nut.
| Alterations | Code | Spec. |
① No Machining on Support Side Shaft End | NC | No machining added on the support side shaft end. Specifying Sample NC |
② Ball Nut Orientation Reversed | RLC | Changes the nut direction. Specifying Sample RLC |
③ No machining of the support side shaft-end retaining ring grooves | RNC | No machining of the support side shaft-end retaining ring grooves. Specifying Sample RNC |
④ Change the length of the support side shaft end | FC | Change the length of the support side shaft end. 21≤FC≤80 FC=1mm increments Ordering Code FC30 |
⑤Change the machining content of the support side | GC | Change the machining content of the support side. 5≤G≤80 Choose Q from 12, 15, 20, 25 and 30 G=1mm increments Ordering Code GC-Q25-G30 |
 Only one of ①, ③, ④ and ⑤ can be selected.
 Only one of ⑦, ⑧ and ⑨ can be selected.
 Only one of ⑩ and ⑪ can be selected.
 When ⑫ and ⑬ are specified simultaneously, no male thread will be machined regardless of the value specified for U in ⑫.
 When specifying any alteration, the nut motion range (Y dimension) may become shorter. Please make sure that the nut motion range is greater than the full length of the nut.
■Fixed side
| Alterations | Code | Spec. |
⑥ Machining fixed side wrench slots | SZC | Adds wrench flats on the fixed side shaft end. Specifying Sample SZC  Move the nut to the wrench slot, Move the nut to the wrench slot,otherwise the ball will fall off.  The nut may not be moved within the Incomplete Hardened Area. The nut may not be moved within the Incomplete Hardened Area.Note that when selecting. |
⑦ Machining fixed side shaft end keyways | KC | Adds a keyway on the fixed side shaft end. When specified simultaneously with 5≤KC≤37 and ⑪, 5≤KC≤F-1 KC=1mm increments Ordering Code KC10 |
⑧ Machining fixed side shaft end keyways | KLC | The machining position of keyways at fixed side shaft end can be specified. (Keyway size is the same as KC.) When specified simultaneously with 5≤K≤36 K+S≤37 and ⑪, 5≤K≤68 K+S≤F-1 K, S=1mm increments Ordering Code KLC-K5-S3 |
⑨ Machining fixed side shaft end plane | SC | Adds a flat on the fixed side shaft end. When specified simultaneously with 5≤SC≤37 and ⑪, 5≤SC≤F-1 SC=1mm increments Ordering Code SC10 |
⑩ No machining of small steps on the fixed side | NF | No machining of small steps on the fixed side Ordering Code NF |
⑪ Change dimensions of small steps on the fixed side | FP | Change dimensions of small steps on the fixed side 38≤F≤70 15≤P≤25 F, P=1mm increments Ordering Code FP-F50-P20 |
⑫ Change dimensions of big steps on the fixed side | EU | Change dimensions of big steps on the fixed side 16≤E≤150 13≤U≤E-3 E, U=1mm increments Ordering Code EU-E100-U30 |
⑬No machining of big steps male thread on the fixed side | NU | No machining of big steps male thread on the fixed side Ordering Code NU |
■Detailed dimension of alteration KC··KLC keyway

| Shaft Dia. | b | t | ||
| Reference Dimension | Tolerance (N9) | Reference Dimension | Tolerance | |
| 6~7 | 2 | -0.004 -0.029 | 1.2 | +0.1 0 |
| 8~10 | 3 | 1.8 | ||
| 11~12 | 4 | 0 -0.03 | 2.5 | |
| 13~17 | 5 | 3.0 | ||
| 18~22 | 6 | 3.5 | ||
| 23~30 | 8 | 0 -0.036 | 4.0 | +0.2 0 |
| 31~35 | 10 | 5.0 | ||
■Screw shaft runout tolerance

| Type | Screw shaft outer diameter | Runout tolerance G (Maximum) | Incomplete quenching range (ℓ) | ||||||||
| ~315 | 316~400 | 401~500 | 501~630 | 631~800 | 801~1000 | 1001~1250 | 1251~1600 | 1601~2000 | |||
| E-KBS | 40 | 0.060 | 0.070 | 0.080 | 0.090 | 0.100 | 0.130 | 0.170 | 0.210 | 0.320 | 25 |
Product Features
1. Shipping within 5 days.
2. Drawing-based machining is no longer required, saving the time for drawing.
3. The total length of screw shaft can be specified in 1 mm increments. With abundant shaft end specifications, it is possible to specify alterations for different applications.
2. Drawing-based machining is no longer required, saving the time for drawing.
3. The total length of screw shaft can be specified in 1 mm increments. With abundant shaft end specifications, it is possible to specify alterations for different applications.
Example of Use

Precautions
■ Selection and Precautions for Use
● The noise value of the screw after assembly is not guaranteed.
● Although lithium soap-based grease has been applied at the factory, it is required to apply new grease every 2~3 months as standard after receiving the goods, otherwise the normal use will be affected.
●In operation, if there is too much noise or sharp and harsh sound, please make sure that the installation accuracy of the screw and the specifications of peripheral components such as motors and couplings are appropriate.
●Do not let the nut exceed the movement range of the ball screw nut, or screw out of the screw shaft, otherwise the ball will fall off and the ball cycling parts will be damaged.
● Ball screws and nuts placed with an inclination may fall due to weight. Please be careful.
● This product is a machined type, so there will be knife patterns and color difference in its appearance. Small scratches or color changes without affecting the use and main function are of a normal phenomenon. Please feel free to use.
■ Precautions of the ball screw and peripheral parts design and assembly
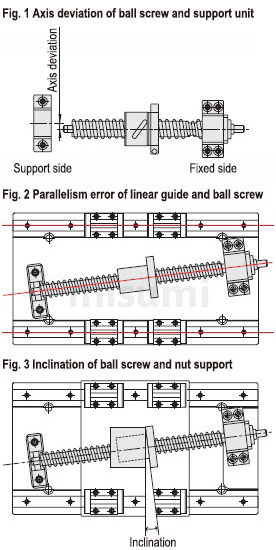
The ball screw is a component that only bears axial load. If it is subjected to radial load or moment load, poor sliding, vibration or abnormal noise may occur, shortening its service life. The reason that the ball screw bears radial load and moment load is the axis deviation and parallelism error of the surrounding parts. Therefore, it is necessary to correctly design and assemble the peripheral parts of the ball screw to prevent errors.
● Axis deviation of ball screw and support unit (Fig. 1)
- Axis deviation is the deviation of the ball screw fixed by the fixed side support unit and the bearing of the supporting side support unit.
-The allowable value of the axis deviation is 20μ or less (reference value)
●Parallelism between ball screw and linear guide (Diagram 2)
- Parallelism error refers to the inclination of the ball screw in the up-down or left-right direction with respect to the reference of the linear guide.
-The allowable value of inclination is below 1/2000 (Diagram 3)
●Precautions of assembly
If you notice abnormal noises during the operation of the ball screw or jamming during movement after assembly, please loosen the connections of the parts before proceeding. Adjust and reassemble after moving smoothly.
- Error in the left and right direction of the support unit (Fig. 1)
- Parallel error of linear guide and ball screw (Fig. 2)
- Fixing of workbench and nut bracket
- Fixing of ball screw nut and nut bracket
| ·Removal of nut is prohibited | ·No impact on the nut | ·Be careful of falling due to weight |
 |  |  |
| ·Checking for reverse action | ·Pay attention to intrusion of foreign objects | ·Nut overstroke is prohibited |
 |  |  |

| Part Number |
|---|
| E-KBS4005-[300-2000/1] |
| E-KBS4010-[300-2000/1] |
| E-KBS4020-[300-2000/1] |
| E-KBS4040-[300-2000/1] |
| Part Number | Price | Minimum Order Qty. | Volume Discount | Days to ShipSố ngày giao hàng | Lead (mm) | Shaft Screw Overall Length L (mm) |
|---|---|---|---|---|---|---|
- | 1 Piece(s) | 12 Day(s) | 5 | 300 ~ 2000 | ||
- | 1 Piece(s) | 12 Day(s) | 10 | 300 ~ 2000 | ||
- | 1 Piece(s) | 12 Day(s) | 20 | 300 ~ 2000 | ||
- | 1 Piece(s) | 12 Day(s) | 40 | 300 ~ 2000 |
Loading...Tải…
Brand Introduction
MISUMI, the head office company, has been providing customers with various high-quality parts such as automation parts, mold parts, electronic parts, tool & consumables, etc. quickly and accurately since its establishment in Japan in 1963. We have created a low-cost business model by compiling our own catalogs and establishing a marketing system to sell our products directly, and we continue to develop MISUMI branded products with a high level of quality by developing an annual product plan based on customer feedback and requests. MISUMI established MISUMI Precision Machinery Co., Ltd. in China in June 2003, and then changed its name to MISUMI (China) Precision Machinery Trading Co., Ltd. in June 2007, with its headquarters in Shanghai. Since the beginning of the stamping die standard parts business, the businesses of FA standard parts, plastic die standard parts and machining tools have been officially started successively, and the rapid development of MISUMI in China has won the full support of customers. China's manufacturing industry has unlimited prospects, which is why China's manufacturing industry market has become one of the most competitive industries in the world. Thus was born MISUMI's business philosophy - the key to the future of manufacturing in China is cost competitiveness as well as "quality" and "time".
Basic InformationThông tin cơ bản
| Screw Shaft O.D.(Ø) | 40 | Type | Precision | Accuracy Grade | C5 |
|---|
- The specifications and dimensions of some parts may not be fully covered. For exact details, refer toCác thông số kỹ thuật và kích thước của mã sản phẩm có thể không được bao phủ đầy đủ. Để biết chi tiết chính xác, hãy tham khảo manufacturer catalogsdanh mục nhà sản xuất ..
Frequently asked question (FAQ)FAQ
- Question:Question: What is the operating temperature limit for the ball screw?
- Answer:Answer: The operating temperature limit for the ball screw is 80°. Exceeding this limit will cause damage to the circulating parts and seals, as well as the deformation of the screw shaft and nut, affecting the life. Grease has a good effect of reducing the temperature, so regular maintenance such as grease injection to the ball screw will improve the service life of the screw.
- Question:Question: How to do if there is abnormal noise heard in use?
- Answer:Answer: MISUMI does not guarantee there is no abnormal noise during use. If abnormal noise occurs, please check the installation accuracy and the correct selection of surrounding parts. Please loosen the parts before re-adjustment. Please refer to "Precautions" for details.


How can we improve?
How can we improve?
While we are not able to respond directly to comments submitted in this form, the information will be reviewed for future improvement.
Customer Privacy Policy
Thank you for your cooperation.
While we are not able to respond directly to comments submitted in this form, the information will be reviewed for future improvement.
Please use the inquiry form.
Customer Privacy Policy