Connector assembly is performed in the following order.
(1) Pass the cable through the cord bushing and connector body, and then solder to the insulator unit contact.
(2) After soldering the wire to the connector, crimp the clamp brackets attached to the connector with the crimp tool (HR10A-TC-02) or pliers.
(3) Fit the insulator unit screw part into the connector body. (Use a wrench and tighten to the values shown in the table.) When tightening the connector body, loosen the D part first so that the solder connection part is not placed under stress.
(4) Tighten the fastening screw so that its tip touches one of the two bosses on the clamp bracket. Note that the fastening screw is fixed with tightening torque of 0.3 N⋅m (3 kgf⋅cm).
(5) Finally, cover the the cord bushing with the connector body.
(!) Since support from Microsoft will end on January 14th, 2020, Windows 7 will be excluded from the recommended environment from December 15th, 2019 on this site. Vì lý do Microsoft kết thúc hỗ trợ cho Windows 7 vào ngày 14/01/2020, Windows 7 sẽ là hệ điều hành không được khuyến khích sử dụng với trang web này từ ngày 15/12/2019.
Search by Category / Brand Tìm theo danh mục, nhãn hiệu
Search by Category Tìm theo danh mục
- MISUMI Việt Nam đồng hành cùng Kỹ sư tương lai trong cuộc thi SMAE Award 2024. Xem chi tiết.
MISUMI Vietnam accompanies Future Engineers in the SMAE Award 2024 competition. See more.
Specification/DimensionsĐặc điểm kỹ thuật / Kích thướcĐặc điểm kỹ thuật / Kích thước
-
CADCAD
- 2D
Days to ShipSố ngày giao hàng
-
- Alltất cả các
- 4 Day(s) or Less
Specify AlterationsChỉ định thay đổi
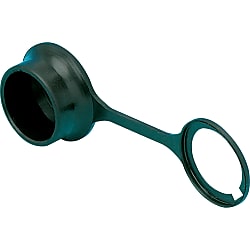
HR10 Dust-proof Cap
Click this image to zoom it.Nhấp vào hình ảnh này để phóng to.
Move the mouse over or click the image to zoom
- Volume Discount
You can add up to 6 items per a category to the compare list.
Part Number :

Copy Part Number URL to Clipboard
The part number URL has been copied into your clipboard.-
- From :
- 80,072VND/Unit

-
- Order Qty :
-
-
- Total Price :
- ---
-
- Days to ship :
- ---
Select part number to Order Now/ Add to Cart

● Prevents intrusion of dust and foreign matter to the fitting surface when mounted on unused panel mount receptacle.

· Does not have waterproof functionality.
Product Description
A dust-proof cap to prevent contamination from foreign bodies and protect the connected portion
Specifications

| Model | Number of Cores | Weight g |
| HR10-7R-C | 4,6 | 0.3 |
| HR10-10R-C | 10,12 | 0.6 |
More Information

| Part Number |
|---|
| HR10-7R-C |
| HR10-10R-C |
| Part Number | Price | Minimum Order Qty. | Volume Discount | Days to ShipSố ngày giao hàng | RoHS |
|---|---|---|---|---|---|
80,072 VND | 1 Piece(s) | Available | 4 Day(s) or more | 10 | |
80,072 VND | 1 Piece(s) | Available | 4 Day(s) or more | 10 |
Loading...Tải…
Characteristics
| Item | Contents |
|---|---|
| Rated Current | 2 A or lower |
| Rated Voltage | 14-core: 150 VAC / 200 VDC, Other: 100 VAC / 140 VDC |
| Withstand Voltage | 300 VAC or less (500 VAC or less for 4-core) / 1 minute |
| Insulation Resistance | 1,000 MΩ or more / 100 VDC |
| Contact Resistance | 10 mΩ or less / 1 ADC |
| Compatible Wire Size | AWG26 or below Loose Wires or 0.15 mm2 or less Loose Wires |
* For applicable wire size, cable finished outer diameter should be within cable clamp inner diameter.
Material / Finish
| Item | Materials | Finish |
|---|---|---|
| Body Shell | Zinc Alloy | Satin Nickel Plated |
| Pin Contact | Brass | Silver Plating |
| Socket Contact | Phosphor Bronze | Silver Plating |
| Insulator | Polyamide Resin | Black |

Contact Arrangement Diagram

Connection Work Method (Relay type can be done by the same method.)

| Number of Cores | Wrench Spacing (mm) | D Dimension (mm) | Wrench Tightening Force |
|---|---|---|---|
| 4.6 | 7.5 | 10 | 1.5 N・m (15 kgf・cm) |
| 10.12 | 9.5 | 16 | 1.5 N・m (15 kgf・cm) |
Connector Insertion and Removal Method

- The specifications and dimensions of some parts may not be fully covered. For exact details, refer toCác thông số kỹ thuật và kích thước của mã sản phẩm có thể không được bao phủ đầy đủ. Để biết chi tiết chính xác, hãy tham khảo manufacturer catalogsdanh mục nhà sản xuất ..
MISUMI Contact


![]()

TALK ID : Misumi_vn

Copyright © MISUMI Corporation All Rights Reserved.
How can we improve?
How can we improve?
While we are not able to respond directly to comments submitted in this form, the information will be reviewed for future improvement.
Customer Privacy Policy
Thank you for your cooperation.
While we are not able to respond directly to comments submitted in this form, the information will be reviewed for future improvement.
Please use the inquiry form.
Customer Privacy Policy